Get the best advice, tips & tricks for how to glue anything and make sure your craft projects stick and stay stuck!

If you read my post on how to cut anything, I talked a little bit about how I have a Master’s Degree in Architecture. And I affectionately call it a Master’s in Cutting and Gluing. We made so many models and displays and exhibits out of so many materials that it was basically like craft blogger bootcamp.
Want me to glue wire to cotton balls? Sure thing! Bits of dried grass and hay to plexiglass? No problem! One of my friends even glued stale cereal to cardboard for a project once. I’m not kidding, we tried it all. We even learned how to solder.
So while, I’m not going to cover all of these kinds of crazy materials, I thought it might be helpful to talk about some of the different kinds of glues you use for crafts and how to glue anything to anything else. We want your craft projects to stick together and stay stuck!
So first we’ll talk about some of the best types of craft glues, and then I’ll cover which glues to use with which craft supplies and materials. Sound good? Ok, let’s go!
The Best Types of Glue for Crafts
- School Glue – If you’re doing crafts with your kids, go ahead and use classic school glue. It’s non-toxic and easy for them to use. The only downside to school glue is that it’s pretty thin and it takes a while to dry. But most kids’ crafts are done on flat surfaces so that’s ok. School glue can also be used for other craft projects including paper mache and slime, every parent’s favorite kid project! (Psst! Don’t forget glitter glue! That keeps my kids busy for ages!)
- Glue Sticks – Glue sticks are another great choice for kids’ crafts because they’re so easy to use. But adults can use glue sticks too, they are especially good for paper crafts like scrapbooking because they don’t cause the paper to warp or get wavy. I prefer the name brand glue sticks, don’t waste your money on glue sticks (or scotch tape) from the dollar store, they just are not sticky enough. Learned that one the hard way!
- Craft Glue – I know you’ve all used craft glue before, the most common popular brand is this one. Craft glue differs from school glue in that’s it quite a bit thicker. This makes it dry faster and makes it easier to stick things together that are not on a flat surface. It usually dries clear, like school glue and works great as a general all-purpose glue. My favorite formulation of craft glue is actually the “fast grab” formula which dries even faster than the normal one, meaning you don’t have to hold things in place for nearly as long!
- Decoupage Glue – Of course we all know about Mod Podge, the holy grail of decoupage glue. Decoupage glue is kind of a combination of glue and sealer in one. You put down one thin coat to glue down your paper or cardboard or other thin embellishment, and then another coat or two on top to seal it in. They make all kinds of formulations now including glitter and dishwasher safe but my favorite is the matte version because it doesn’t show brushstrokes as much as the other kinds. Decoupage glue is also great because it’s water-based, not stinky and it’s easy to clean up.
- Fabric Glue – Fabric glue is formulated to remain flexible after it dries. Fabric glue will never look as nice as iron on hem tape or sewing, but it can be great for many craft applications or something that won’t be worn/used much like a Halloween costume. Just be aware, if you apply it very thickly, it can soak through the fabric and be visible from the other side (it will dry clear but might make the fabric look splotchy or shiny in spots).
- Wood Glue – Wood glue is specially formulated to glue wood pieces together. They make it in a regular formula and a waterproof outdoor formula. While you can use craft glue for small craft (balsa) wood projects, for anything larger you should definitely use wood glue. It’s water-based and easy to use but make sure to apply it neatly as it often dries with a yellowish tint.
- Glue Dots – Glue dots are super handy for paper crafting like scrapbooking and card making. Especially if you use them with a dispenser, they make gluing and collaging super fast. They’re really easy to handle and you won’t end up with sticky hands. You can get permanent glue dots and repositionable glue dots and they both work great.
- Glue Runners and Double Stick Tape – While not technically glue, per se, glue runners and double stick tape are such great adhesive crafting tools. They’re great for lightweight crafting like paper crafting or even cardboard and ribbon. And they come in varying strengths from repositionable to permanent heavy duty. One big advantage of glue runners and double stick tape is that you can attach straight edged craft materials very very precisely.
- Hot Glue – I mean, all crafters LOVE hot glue, don’t we? It’s easy to use, it holds well and it dries/sets super quickly. The downside to hot glue, of course, is that it’s hard to apply very neatly and it leaves strings behind. And it’s hard not to burn yourself at least once. It happens to everyone. I like a dual temp hot glue gun, sometimes you need the hot glue to cool more quickly and the lower temperature option is helpful. I find hot glue is best for applications where you won’t see the glued area like when you’re gluing something down or on the inside joint of a cardboard project like Thomas here. But hot glue has become so popular that there are even hot glue craft ideas and fun supplies like glitter hot glue sticks!
- Super Glue – Super glue is great for non-porous surfaces and small craft projects, especially plastics. There are traditional super glues but many crafters love a brand called zap-a-gap which fills small gaps and is very versatile. Its sticks fast and holds tight. But of course all super glues are very stinky and if it gets on your skin it’s hard to get off. I recommend using super glue with an accelerator spray which makes it dry even faster!
- Heavy Duty Glue – This E600 glue is a long-time crafters’ favorite heavy duty glue and it’s very very strong. It’s also good for gluing different materials together. It is water-based and dries clear but does have a strong smell so be sure to use in a well ventilated space.
- Spray Adhesive – Spray adhesive can be very handy when you need to glue large surface areas like a poster to a sheet of foam board, for example. There are both permanent and repositionable versions available and they both work great. Some people even use spray adhesive to baste quilts! However, though it works well for paper crafting, it’s not always the strongest bond and might not hold up heavier materials. It’s also difficult to control its application, you often end up with sticky overspray. You should definitely use spray adhesive outside, it’s messy and smelly.
Tips & Tricks for Gluing Craft Projects
- Make sure you’re using the right kind of glue for the job (I’ll cover that below)!
- Let it dry thoroughly. Read the instructions and let the glue dry as long as possible. If you try to move your project before the glue is 100% completely dry, you risk ruining it and then you have try and remove the old glue and start over.
- Feel free to use tools to apply the glue neatly. You don’t have to only squeeze the glue out of the top it came with. For detailed projects I love to use a toothpick or bamboo skewer with a pointed tip to apply glue carefully. Kids can use a q-tip dipped in glue for their projects. You can even use a paintbrush to apply glue as long as you make sure to wash it quickly before it dries.
- Get creative to hold craft projects in place while the glue dries. A set of mini clamps can be really handy, I also sometimes will tape projects together or in place with a low tack tape just to hold them in the right spot while the glue dries. Just don’t feel like you have to stand there and hold your project with your hands the entire time!
- Clean your glue container/applicator tip before you put the glue away–Ever tried to glue something and you can’t get the glue out? If you don’t clean the tops of glue containers, old dried glue clogs up the applicator tip and you can’t use it the next time. To clean a water-based glue like school glue or craft glue, first wipe off excess glue with a paper towel. Then, if the applicator tip is removable, you can then take it off and rinse it with water. If it comes with a cap, make sure to put it on before storing the glue. For other glues like super glue, wipe the tip with a paper towel and clean the hole in the applicator tip with a toothpick or sewing pin to make sure it stays clear.
- Remember, glue has a shelf life. Many glues like craft glue, glue sticks, decoupage glue, school glue and even super glue, can start to dry out and lose moisture over time. This will make them much harder to get out of the container and work with. So if your glue gets too dried out and thick, just replace it.
What Kind of Glue Should I Use?
Please keep in mind that these suggestions are my opinions and are in the context of CRAFT PROJECTS only. If you’re gluing things for home improvement or DIY applications, I suggest this website.
How to Glue Paper
For light use paper crafts where you might want to change things; use repositionable glue dots, spray glue or a glue runner
For permanent paper crafts: use a glue stick or permanent glue runner/double stick tape
To glue paper to other surfaces: use decoupage glue to glue the paper down and another coat or two to seal it to the surface. Make sure there are no air bubbles!
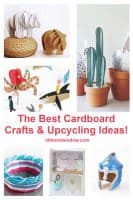
How to Glue Cardboard
To glue thin cardboard together: use craft glue or permanent double stick tape
To glue thick corrugated cardboard together: use hot glue, apply carefully to avoid visible glue leaks and strings
How to Glue Fabric
To glue fabric together: use fabric glue, apply thinly so it doesn’t soak through the fabric
To glue fabric to other materials: consider using decoupage glue and decoupaging the fabric just like you would paper
How to Glue Felt:
To glue felt together: craft glue or fabric glue work great!
How to Glue Wood
To glue thin craft wood like balsa or basswood together: use craft glue or wood glue
To glue any other wood together: use wood glue, make sure to apply it carefully and wipe off any excess
How to Glue Foam
To glue thin sheets of craft foam: use craft glue
How to Glue Styrofoam
To glue styrofoam together: use craft glue
Do not use: spray adhesive, hot glue or super glue, they are likely to dissolve the styrofoam and give off fumes
How to Glue Plastic
To glue small pieces of plastic together: use craft glue, super glue or hot glue
To glue bigger pieces of plastic together: use heavy duty glue
How to Glue Plexiglass
To glue plexiglass together: use super glue and a super glue accelerator, apply sparingly at the joint and hold until dry
How to Glue Glass
To glue glass together or to other surfaces: use heavy duty glue, you really don’t want it to break!
How to Glue Metal
To glue metal together or to other surfaces: use heavy duty glue or a metal epoxy glue
How to Glue Ceramics
To glue ceramics together or to other surfaces: use heavy duty glue
Note: if you are making a mosaic craft with ceramics you should be using a thinset mortar under the tiles to attach them to the surface and grout between them, no glue at all
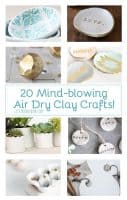
How to Glue Air Dry Clay
To glue air dry clay together: use craft glue or heavy duty glue
How to Glue Polymer Clay
To glue polymer clay that has already been baked: use super glue
How to Glue One Material to a Different Material
It can be tricky to know how to glue any one material to a totally different material. Some are easy, for example, gluing craft foam to paper works just fine with craft glue. But say you want to glue metal to ceramic? I love this website for more unusual gluing situations.
Or you can just give it a try! If you have scraps of the materials available, try gluing them together with different glues and see what works the best!
If you liked this, you may also like some of my other posts…

- Crayon Scarf Knitting Pattern - July 21, 2026
- Pencil Scarf Knitting Pattern - July 7, 2026
- Tri-Color Linen Stitch Hat Knitting Pattern - June 22, 2026
Anne says
What is the best glue to use for a q-tip craft such as a q-tip skeleton?
Cassie May says
If it is a flat project, I would suggest either school glue or thick craft glue like Aleene’s. If it is a 3D project, I would use hot glue. 🙂