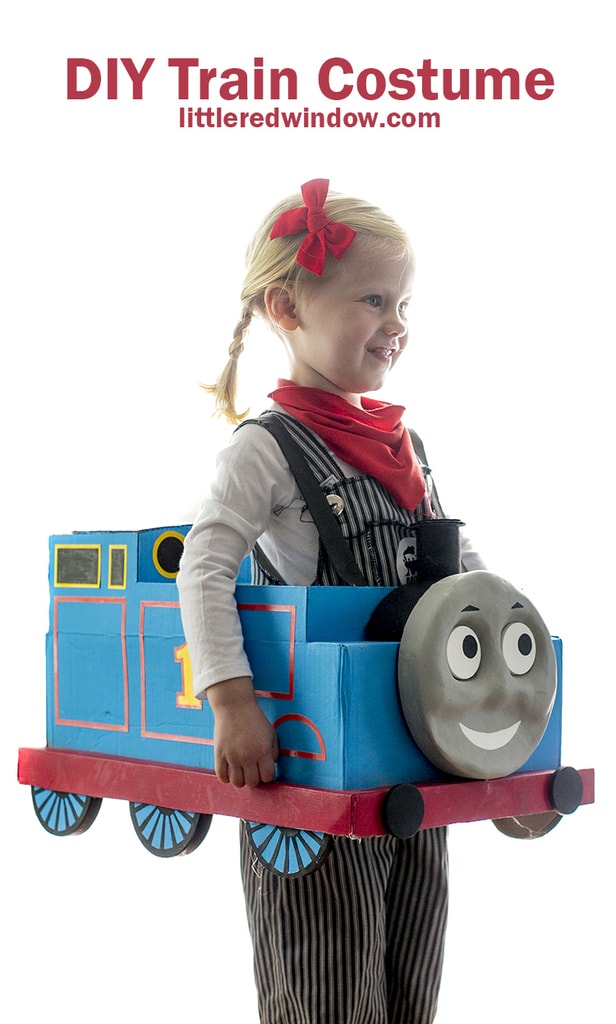
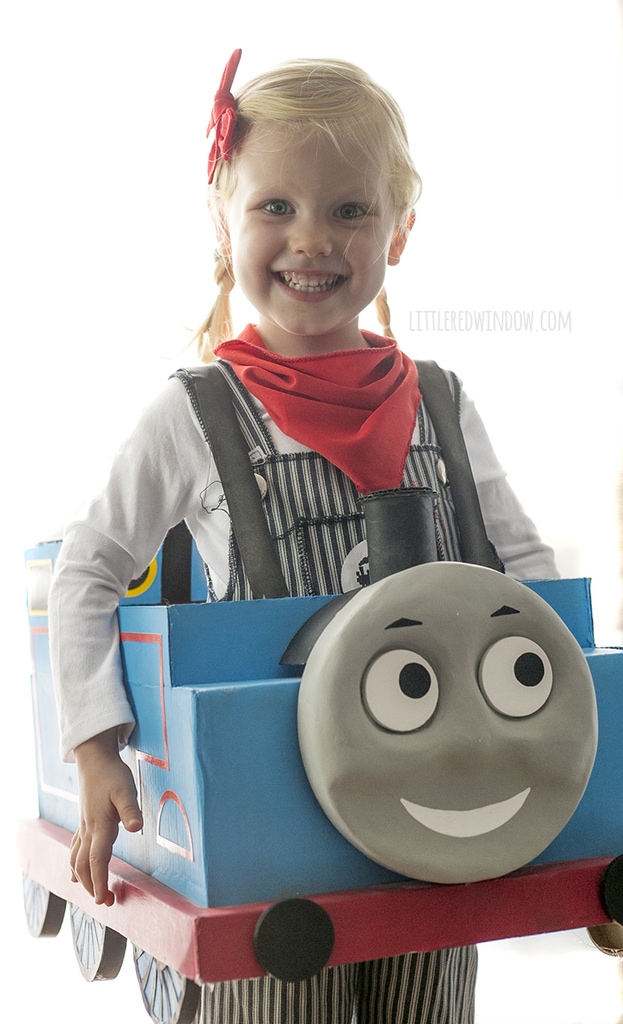
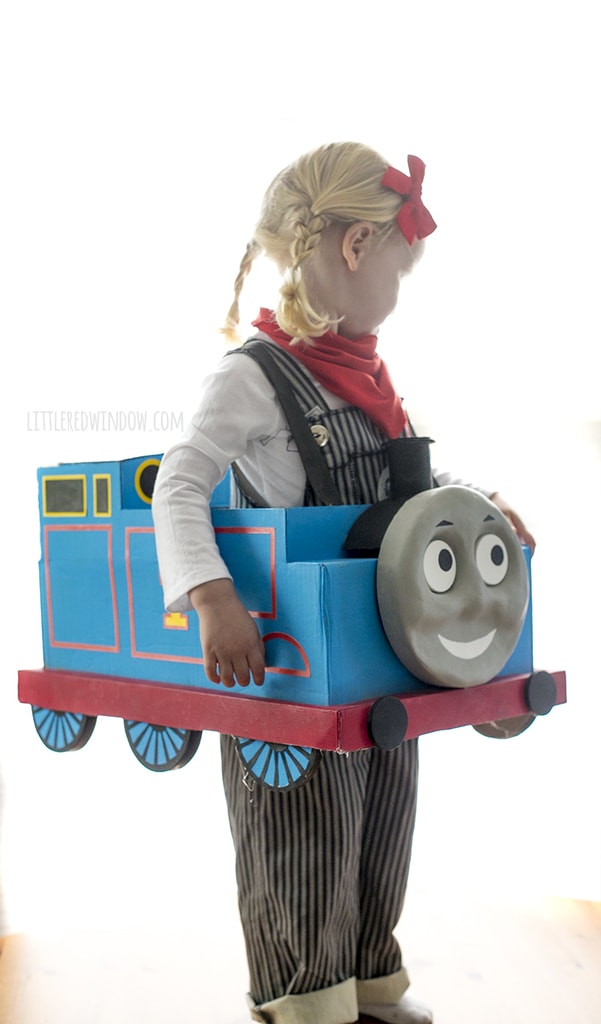
This DIY Thomas the Train Costume you can make from a cardboard box is so adorable, your little train engineer will be thrilled!

When I asked O what he wanted to be for Halloween this year, and once I explained the concept (I don’t think he remembers last year), the answer was a resounding “TRAIN!” And if you have or have had a preschooler, I’m sure you know that it was not just any train, it HAD to be similar to a THOMAS the Train costume (otherwise known as Thomas the Tank Engine if you really want to be accurate).
The kid looooves Thomas. I tried convincing him maybe we should think outside the box and go for Thomas’ trusty friend Percy maybe? Or Toby? But no, Thomas the Train is the fave. So a look alike DIY Thomas the Train costume it is!
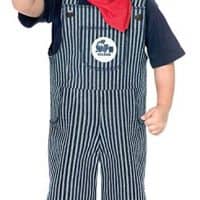
(PSST! Get the Train Engineer Costume with overalls, hat and kerchief HERE!)
I knew I wanted the DIY Thomas the Train costume to be 3D and I had some boxes sitting around so I figured that was the perfect place to start. I grabbed a few other things from Michaels, got a toy Thomas from the play basket for reference and got to work.
I feel like I should say that of course, making vehicle costumes out of boxes is not my original idea. They’re all over the internet. Pinterest even has quite a few Thomas the Train costumes. But I wanted to share my method since I didn’t reference any other tutorials and just figured it out as I went along.
DIY Thomas the Train Costume Supply List
- Train Engineer Costume (O, who is pretty tall, fit comfortably into the 3T-4T size at age 3.)
- Cardboard box (mine was 18″ x 12″ x 6″)
- Lid of a slightly larger cardboard box ( I used a boot box)
- Craft knife
- Hot glue gun
- Blue craft paint
- Red craft paint
- Black craft paint
- Round paper mache box for face (8″ diameter)
- 2 4 inch round paper mache boxes (lids only) for the wheels.
- Wood discs (for the eyes)
- Paper mache (or make your own the usual way)
- Spackle (optional)
- Train Whistle (optional)
DIY Thomas the Train Costume Instructions
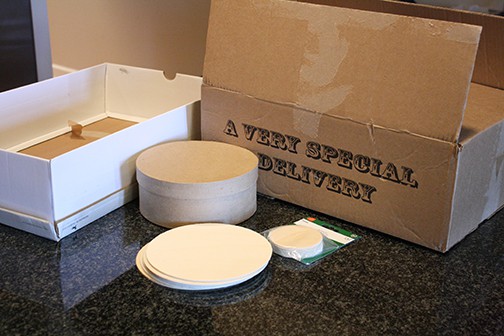
I didn’t end up using those big wooden circles pictured above, instead a I used a couple 4 inch paper mache lidded boxes like the one in the middle.
My first step was a sketch to figure out the basic volume of my Thomas the Train inspired costume.
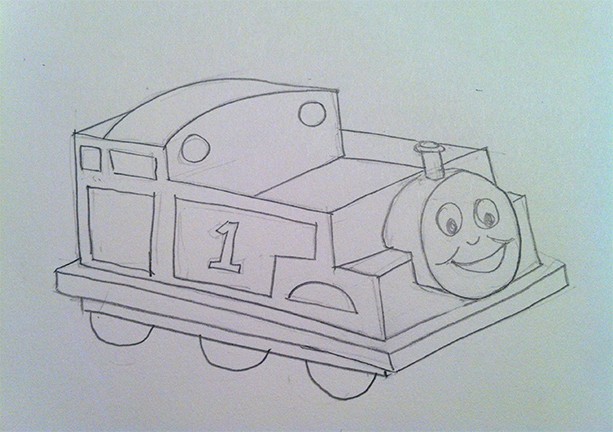
I pretty much approached this like building an architectural model, I drew it first and then tried to build it with the minimum possible number of seams and pieces.
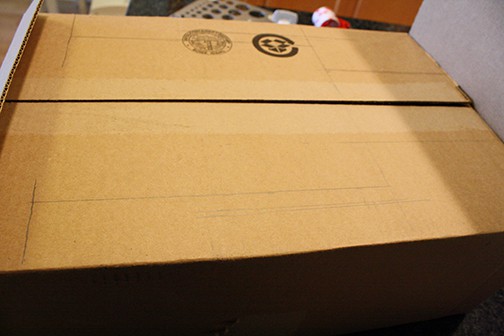
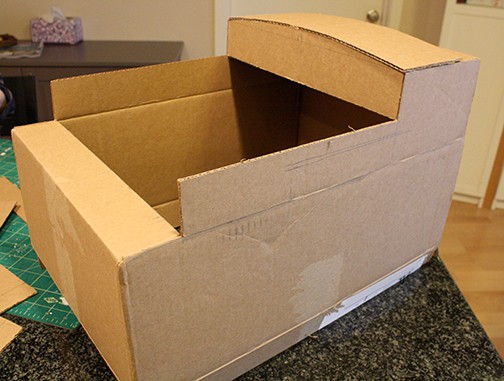
I cut out the bottom of the box and then measured and drew my cuts on the top flaps. I know it doesn’t make a lot of sense in this picture.
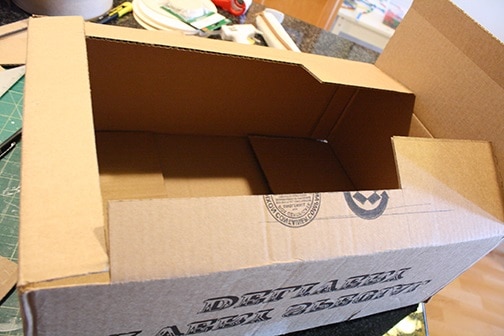
But once you cut out the middle and fold up the side flaps…
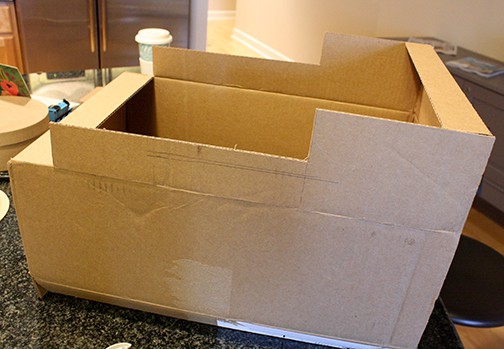
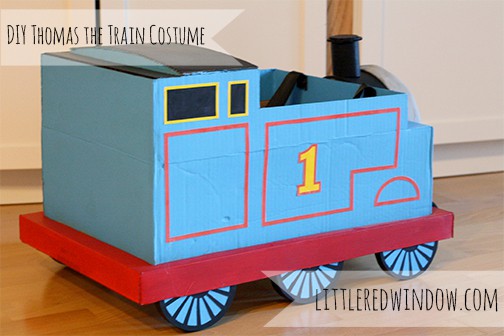
It kinda starts to look like a train, right? Next I added Thomas’ roof.
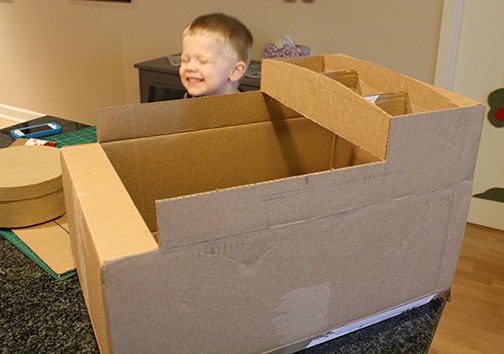
Cheesy “helper” recommended but not required…
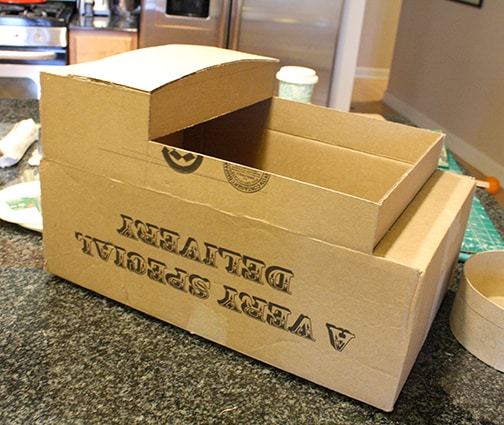
After the roof, I added the piece across the front and started painting it.
Then I took that other boot box from the first picture and made the red platform that Thomas’ body sits on.
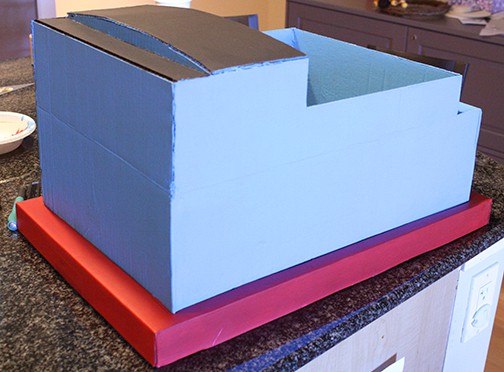
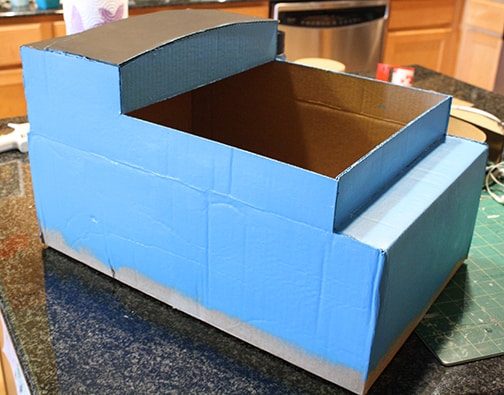
One thing I have learned over the years of painting furniture is that red paint is really frustrating. It takes many many coats to get even opaque coverage. A lot of Thomas’ markings are red lines and I could just see myself painting them over and over and over and still having blue show through.
So I drew his markings in Illustrator and printed them out on cardstock instead. And then I carefully cut them out and glued them to his sides like decals. It worked out great and the lines are straight and even, much neater than I could have ever painted them!

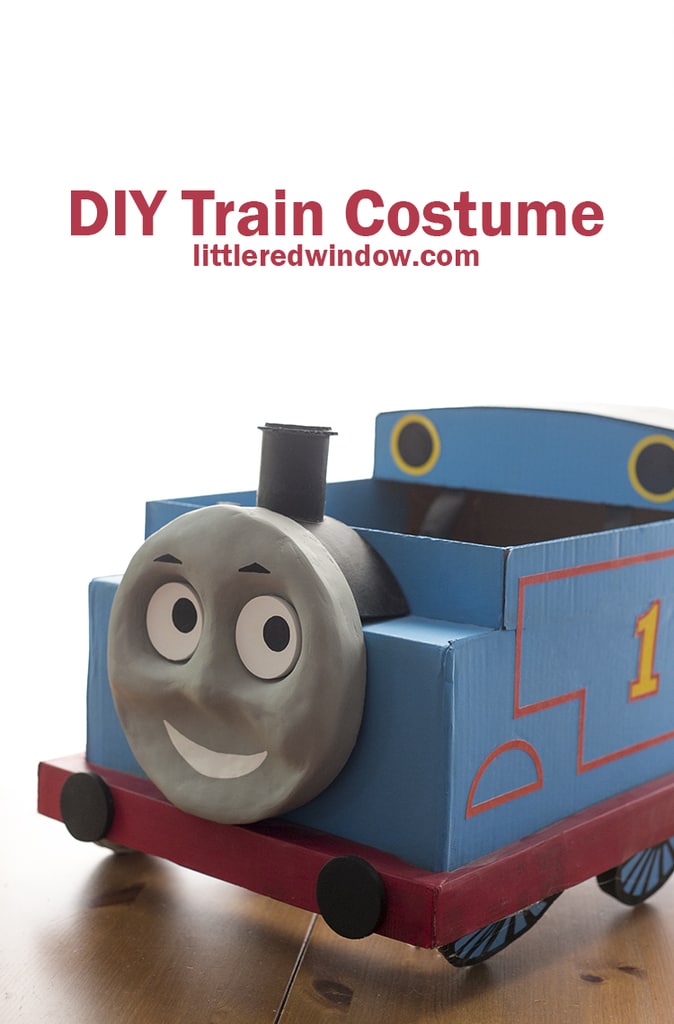
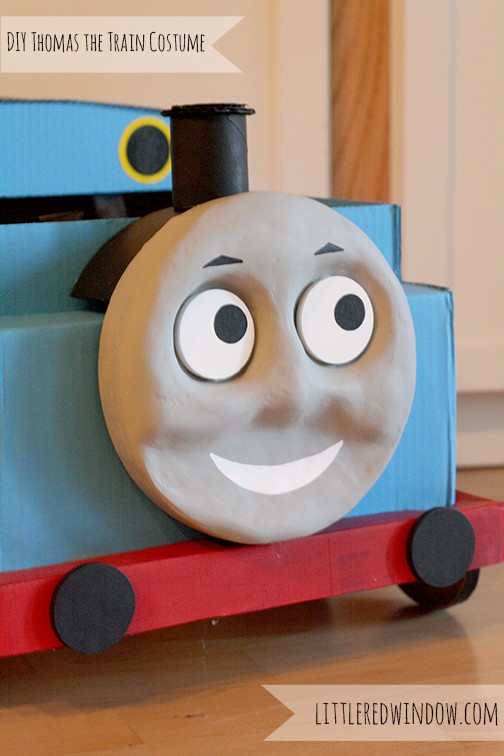
Then it was time to figure out Thomas’ face. When I googled Thomas the Train Costumes, I mostly saw flat faces. And they were plenty cute and that was what I was planning to do because it’s easy. But then about halfway through I had the crazy thought to try making a 3D face.
I mean, the 3D face is kind of what Thomas and his friends are known for, right? So I ran my 3D face scheme past my husband. And he said, “I don’t know…that sounds kind of ambitious.” Which to my ears, actually sounded like a challenge. A
nd I can’t back down from a craft challenge. Plus I figured, if it didn’t work out, I could always go back to plan A!

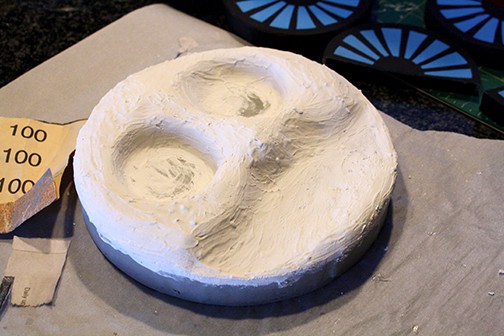
So I started with one of these lidded paper mache boxes from the craft store.
I measured, marked and cut it to fit onto the front of Thomas’ body.
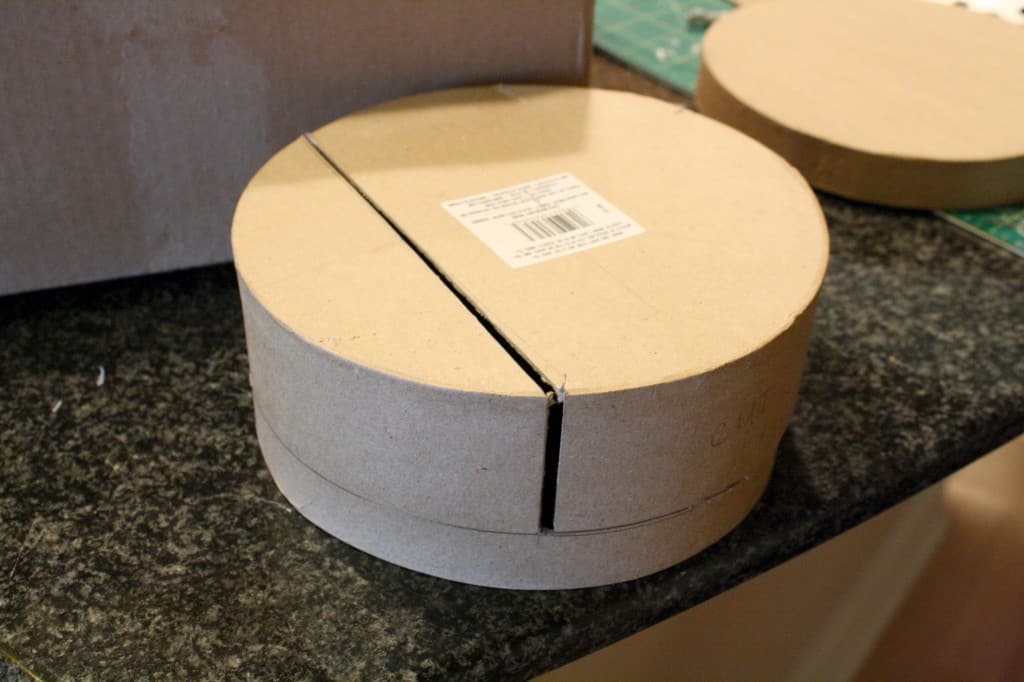
This last picture shows the lid of the box back on and that was going to be the base for Thomas’ face. After thinking for a bit, I decided paper mache sounded like my best bet.

First I sketched Thomas’ face on the box lid, then I used crumpled and rolled paper covered in masking tape to sculpt his face. For most of these steps, he looks suuuuper creepy. Sorry! But, it’s Halloween so it’s cool, right? At this point I was going off my memory of the last time I did paper mache which might possibly have been making pinatas in middle school spanish class. I mixed half white glue with half water, tore up some strips of the Onion and got to work.

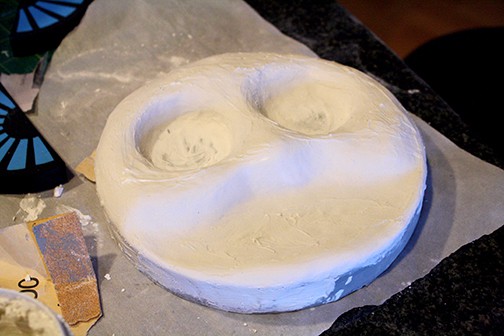
Once that dried, I tried painting it but it was way too bumpy and lumpy for my perfectionist tendencies. So that’s when I had my next crazy idea. I said to my husband, “What if I spackle him?” To which he replied, “I don’t know…” in a very skeptical tone of voice.
If you haven’t noticed, when Aa thinks something sounds like it might be a crazy idea, I, of course, decide that it’s brilliant and it will work! We spackled all kinds of things in architecture school, I figured why not try it?
Unfortunately, I only had half a little container of spackle that was about 80% dried out. Undeterred, I added some water and stirred. And stirred. And stirred. And hey! Guess what! You can reconstitute spackle! So Thomas got spackled…
Then I sanded and re-spackled and smoothed until he looked waaaaay better.
After some paint, it turned out I was right, the 3D face was awesome! And Aa was sufficiently amazed.
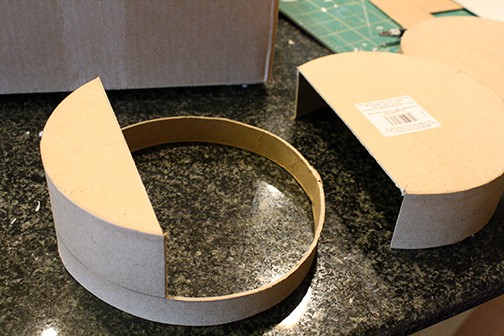
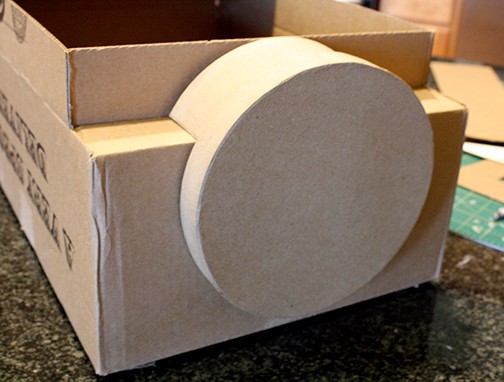
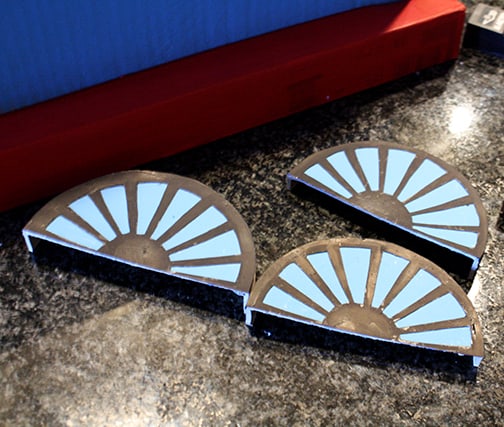
The next thing I tackled was his wheels. I used two of those round paper mache boxes in a smaller size and made six wheels from the tops and bottoms.
I painted them blue and then decided they needed a little detail. Having just had so much success with the decals I used to put the lines on Thomas’ body, I drew out a sunburst shape on some thick magazine paper and cut them out.
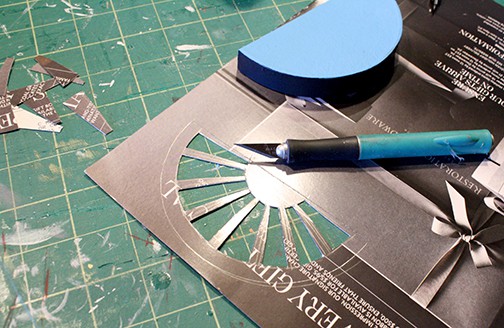
Then I painted them black and glued them to the wheels!
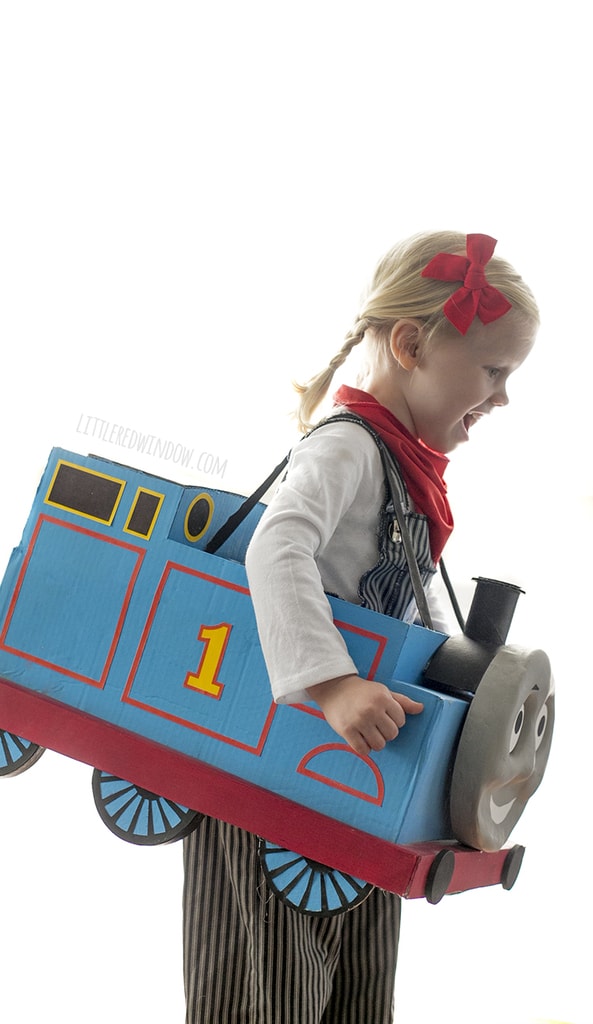
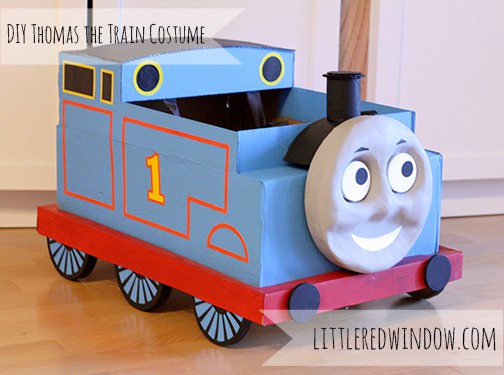
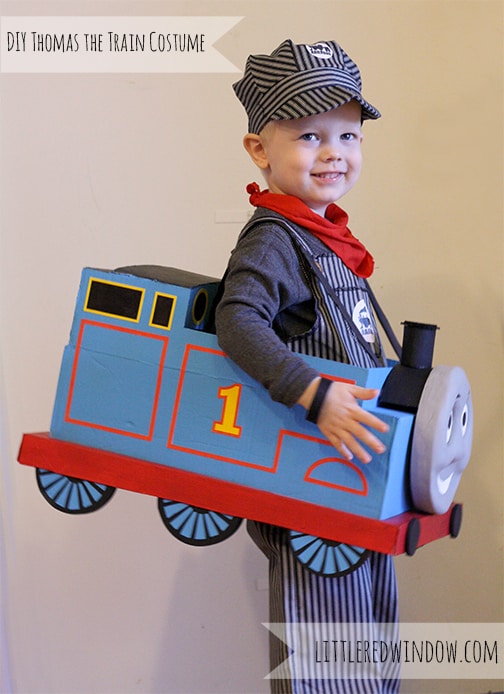
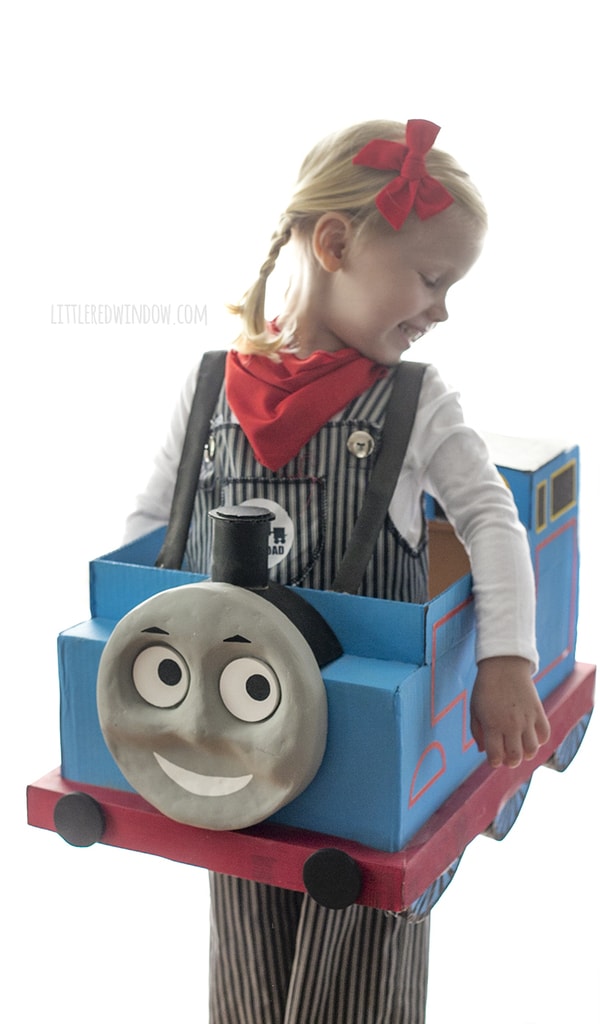
After that I attached the wheels, made a funnel out of a toilet paper tube, added the bumpers and fashioned some straps from the handles of a reusable shopping bag (does everyone else have approximately 7,000 of those?!) And O’s DIY Thomas the Train costume was ready!

Of course O is dressed as the train engineer who drives Thomas! He wore this once already and it was a huuuuge hit!
(And no I didn’t make the Engineer costume, I got it on Amazon. I’m not totally insane. 😉 And because I get asked, at 3 yrs old, O, who was pretty tall, fit comfortably into the 3T-4T size.

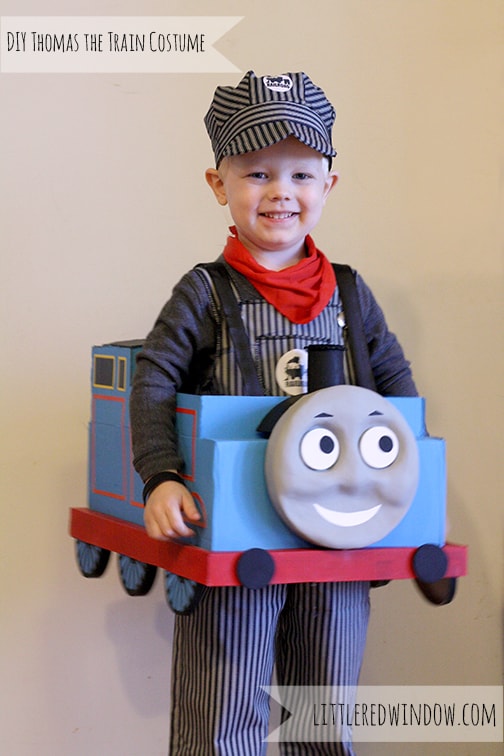

Choo! Choo!
Tips and Tricks for making your own DIY Thomas the Train Costume…
- Don’t worry about the exact dimension of the boxes I used, find one that fits your child and go from there.
- Many people have recreated this Thomas the Train costume without the 3D face. I promise, it still turns out extremely cute, just find a picture of Thomas’ face and print it out at the right size!
- If the weather forecast is questionable, you might want to give you Thomas the train costume a little spray with some poly or other clear protectant. Or have your little one wear a clear poncho on top!
- One more time, HERE is the link for the train engineer costume. If you’re really daring, grab a train whistle for your little one too! Choo Choo!
DIY Thomas the Train Costume

Make an adorable Thomas the Train inspired Halloween costume from an old cardboard box!
Materials
- Train Engineer Outfit
- Train whistle - optional
- Cardboard Box
- Lid of a slightly larger box
- 8" diameter round paper mache box
- 2 4" round paper mache boxes (lids only)
- 2" wood discs
- Blue craft paint
- Red craft paint
- Black craft paint
- Gray craft paint
- Yellow craft paint
- White craft paint
- Paper mache
- Spackle - optional
- Webbing or ribbon for straps
Tools
Instructions
- Cut the cardboard box flaps and fold up to make the train shape, cut out the bottom of the box.

- Add a curved piece of cardboard for the train roof.

- Add the extra box lid around the bottom for the base of the train.

- Paint your train.

- Add the train markings and decoration with paint or by designing and printing from a computer.

- Measure and cut the train's face.

- Use paper mache to make the face 3D.
- Spackle the paper mache to make it extra smooth.
- Paint and attach the face.

- Cut the 4" round box lids in half, paint and glue on as wheels.

- Glue on webbing or ribbon as straps to hold the train on your child's shoulders.


Notes
- Don’t worry about the exact dimension of the boxes I used, find one that fits your child and go from there.
- Many people have recreated this Thomas the Train costume without the 3D face. I promise, it still turns out extremely cute, just find a picture of Thomas’ face and print it out at the right size!
- If the weather forecast is questionable, you might want to give you Thomas the train costume a little spray with some poly or other clear protectant. Or have your little one wear a clear poncho on top!
Recommended Products
As an Amazon Associate and member of other affiliate programs, I earn from qualifying purchases.
If you liked this, you may also like some of my other posts…

- Crayon Scarf Knitting Pattern - July 21, 2026
- Pencil Scarf Knitting Pattern - July 7, 2026
- Tri-Color Linen Stitch Hat Knitting Pattern - June 22, 2026
Syndal says
Omg thank you I made this. My son is obsessed with Thomas. I made one little tweak. A hole thru the chimney and a little door on the inside behind it and my son could collect his candy this way. He won best costume in the neighborhood.
Cassie May says
such a great idea, I love it!
Taylor U says
Thank you so much for this post. My twins are obsessed with Thomas right now and I made this for them this year (x2). It was such a hit and helped this not-so-artsy mom win Halloween.
Thank you again!
Cassie May says
Oh yay, I am so happy to hear that!
Audrey Kawasaki says
Thank you so much for this guide! We just successfully made a Thomas with the help from you. I posted to my insta: audkawa
Diana Wilson says
My son absolutely adores Thomas the train, definitely going to make this for Halloween! I hope I’ll make it as beautiful as you did.
Fabian says
Esta muy interesante y barato de hacer…
Lo que se me ocurre que ya una vez que pase el evento, se puede poner nuevamente el fondo y entonces usarlo como caja para juguetes =)
It is very interesting and cheap to do …
What occurs to me that once the event passes, the box can be put back and then used as a toy box =)
Kate says
Can you please tell me how heavy it was? I’m worried my 3 year old will complain about having to wear it. Did yours?
Brian Routt says
That model is rocking his costume!
BestTammi says
I see you don’t monetize your page, don’t waste your traffic, you can earn additional bucks every month.
You can use the best adsense alternative for any type of website (they approve
all websites), for more info simply search in gooogle:
boorfe’s tips monetize your website
Stephanie spurlock says
Thank you so much for the tutorial! I made my son one for Halloween this past year and it was a hit! My 3d Thomas face didn’t work out well though so it had to be flat lol
Heather Puhan says
Thank you! My Thomas is not as neat as your, but your step by step helped immensely!
Ashley says
I’m so excited to find this post. I dont want a flat face for our Thomas either!
Vanessa says
Hi, I know this is a super old post but I have a question for you–what did you do with the entire bottom of the box? Did you cut out the flaps? My Thomas structure is about 99% done, but I just realized my son won’t be able to stand in it unless there’s a hole there. Thanks!
Cassie May says
Yes, cut out the entire bottom!
Jenna says
I am making this for my son for this year. I was just thinking how you made this 4 years ago and how your little guy must be all grown out of Thomas now! Anyway, thanks for this. I hope it turns out as good as yours!
Cassie May says
I know! But we still have it and now #2 is big enough to wear it! She’s a thomas fan too! Hope yours turns out cute!!
Mireille says
Am I able to purchase this from you or have you make one for purchase?
Cassie May says
No, I’m sorry, I do not! It’s a DIY tutorial only 🙂
Maria says
Hmmmm, I like this even though this blog is 4 years ago. Lol 🙂
Trisha says
My 5 years old daughter love this. Thanks for sharing.
Annalise Malin says
I’m 20 and attending art school and this design will help me create my own adult version of this for my schools Halloween contest. 2017, I know right that was a long time ago. Small artistic adjustments but the same idea. Thank you. I’ll be sure to update this when it happens.
Heather says
Thank you SO MUCH for this. My son is obsessed with Thomas and this literally made his dream come true. I love to paint and create things but building a replica of something so beloved is daunting. This was the push I needed. I only really changed a few things: I put a bit of batting in the “toot”, I nixed the extra box on the bottom and used a strip of red paper (my box as already too wide), and I moved my wheels all the way up onto the box because they kept popping off. OH and I covered the whole thing in a few coats of Glossy Mod Podge which REALLY brought it to life.
/var/folders/fv/bwhvbm7x5cd2l37b1__69tlw0000gn/T/com.apple.iChat/Messages/Transfers/FullSizeRender.jpg
/var/folders/fv/bwhvbm7x5cd2l37b1__69tlw0000gn/T/com.apple.iChat/Messages/Transfers/FullSizeRender-1.jpg
Cassie May says
I’m so glad you liked it and had fun making your own! Happy Halloween!!
carmen says
than you very much!!!
carmen says
hi,its is beauty,you can show me which spackle do you use for the face,please!!! I want to buy the spackle correct please!!!!
Cassie May says
Hi! I was just regular spackle like you’d use to patch nail holes in your wall!
carmen says
thank you,there is any brands,just buy the correct,you think anyone will serve,you no have picture?,please
Cassie May says
Hi!
I made this so long ago that I don’t remember what brand I used, I’m sorry! I think any one will be fine. I guess I’d just avoid the kind that changes color as it dries. 🙂
Abby says
How big is the paper mache box you used for the face?
Cassie May says
It is 7 inches in diameter. 🙂
Abby says
Awesome! Aside from the paper mache face, how long would you say this took you? Thinking about trying to tackle it this weekend!
Cassie May says
It’s been a while since I made this, but I’m going to say it depends on how crafty you are. I’m pretty quick and I did it over a weekend stop and start. It wasn’t that bad. Plus you’ve got instructions! Ha!
Carmen says
This. Is. Awesome.
Cassie May says
awwww, thank you SO much!!
Amy says
This is amazing. My son LOVES Thomas!!! I am thinking I might make an attempt to recreate this.. I know you said a few years ago that your son loved it and you were not willing to sell it then. Is that still the case? Because I would love to buy it from you if it were available.
Thanks 🙂
Cassie May says
Sorry, still not willing to part with it! Thanks for the kind words!
Crystal says
I tried this last year for my then, 3 year old. It was perfect! Your instructions were great. I chose to use home made paper mache and found a light sheet rock paste that worked perfect to form the face. I too, pay attention to the details. It turned out great. I wish I could post a photo to show you how it turned out. Now with them getting bigger, we’ve kept it, but should probably sell it since some may not have the time or want to take the time to make one by hand. Either way, it was a great idea.
Amy says
If you have pictures of yours I would love to see them and consider buying yours!
Heather says
What did you use to join the cardboard together where necessary? Such as when you added the roof supports and then the roof?
Ha patel says
What size of the paper mache box did you use? Having trouble finding
Dee-Dee says
This is a great tutorial – thanks for sharing! I am using it to make a black locomotive for a store Christmas window display (à la Selfridges London) – minus the Thomas face and the opening for the costume-wearer – and wondered how you adhered the various pieces to the box, such as the roof, the front panel, etc. Did you just use hot glue for that? Thanks!
Cassie May says
Yep, hot glue! That’ll be more than strong enough especially since yours will just be for display. I’d love to see the finished product!
Dee-Dee says
If it turns out to look like anything, I can send you a pic. How do I do that?
Cassie May says
Email me at littleredwindow@hotmail.com!
Jenn A says
I’m making one too! Did you hot glue the face to the body?
Jane says
Thanks so much for sharing. We just replicated a Thomas and Henry!
Cassie May says
Cool! I’d love to see them!!
Rachel says
I’m making this for my son’s costume this year and I’m almost done. Two quick questions: What did you use for straps and where did you hot glue them in the back? Thank you!
Cassie May says
Hi Rachel, I just used some black grosgrain ribbon that I had on hand. It’s probably an inch wide. I hot glued it down on that vertical surface (inside) just behind where the kid stands. Does that make sense? 🙂
Rachel says
Sure does! Thank you! How do I send you a picture of how it came out?
Cassie May says
Email me at littleredwindow@hotmail.com!
Jenn A says
So cool! Thanks for sharing!
Eliane says
Thank you so much, Cassie. And what about the eyes – is that foam? I hope my Thomas looks a tiny bit like yours 🙂
Cassie May says
I believe I used flat wood discs!
Eliane Almeida says
Amazing work, Cassie! Quick question if I may: did you paint Thomas’ face in grey? I see eyes are white, but just wondering how to make the face grey: paint? Thanks very much, Eliane
Cassie May says
Yes, I used a light gray acrylic craft paint!
BJ says
Luckily, I am an architect and can follow your great directions/pics. I may not go as far as you did on the 3D face, the mom said that was ok. I have an idea of getting a color photo of Thomas’s face blown up at the print/copy store if the price is rt and image clear and glue it to the round bx. I also found some very large plastic eyes w/ the moving black pupil at Walmart I’d like to use on the face. I do have 2 questions: to get the proportions rt.. “what was the size of the Rd bx you used for the face?” … 8″ diameter or 10″ ? and …it looks like you just used the lid of the boot bx for the base? …or did you cut dwn the bx part to a depth of ? 3″ ? Thanks in advance.
Cassie May says
I’d say 8″ is about right for the face & yes it’s just the lid of the boot box! Good luck!
Katie says
I used your directions to make a Henry costume for my son last year and he is INSISTING I make him a Thomas costume just like it for this Halloween. Thanks so much for your directions! Everyone loved it last year, so I’m sure they will again this year.
Cassie May says
Awesome! I’d love to see the Henry version!
Julie says
This is amazing! Have you considered making costumes and selling them? If so I’d be very interested!
Cassie May says
Oh gosh, if they took less time, maybe! 😉
Rebecca says
Awesome! Thank you for your creative mind and sharing! I am struggling with the arch piece that is part of the roof. I was wondering if you created this freehand or used a tool or template? Thanks!
Cassie May says
Just freehand, sorry i don’t have an easier suggestion. 🙂
Rachael says
WOW you did an amazing job! I made my son a Kristoff costume last year, which was fairly simple( along with a sled over our red wagon), but this is great. We are going to disney for Halloween though and i think it would be a feat to get this to Orlando otherwise i would try it, becuase you gave fabuloud instructions!! Keep it up girl!!
Cassie May says
Thank you so much! I love the idea of making your own wagon into a sled! So cute!
karren says
OK, I love this costume! I have to try it this year!
Emma says
Thank you for your super helpful guide, i made one for my son! I am in no way artistic so was extremely pleased with my effort and my son loved it
Cassie May says
oh good! I’m so glad he liked it! Thanks for stopping by!!
Kerri says
I love the costume and I have a few questions for you in regards to your costume? If you could reply on here or email me please, thank you!!!!!
Cassie May says
Sure, email me at littleredwindow@hotmail.com and I’ll try and answer them! 🙂
Sara says
Hi,
Great costume! You are very talented and creative.
I was wondering how your son got in and out of the costume if the straps were hot glued onto the box. Does the whole thing lift onto him and off of him over the top? I just worry about not getting the straps stable enough for my 4 year old to make it through trick or treating. And how to make it fit him right.
Thanks!
Sara
Cassie May says
Yep! It goes on and off over his head! We did not have a problem but if you’re worried you could attach the straps with mayble a staple or a brad?
Gabrielle says
I will be attempting to make this over the weekend for my sons Halloween school parade. If I get it together I will look like a supermom!!
Meggers says
Thanks so much! I made one for my son for this Halloween. We already went to a costume party this weekend and it was a HUGE hit! THanks for your tutorial!
Cassie May says
oh good! I’d love to see a pic!
Meggers says
Is there a way to attach a picture here? I don’t have a blog, or I can email it to you.
Cassie May says
you can email it to littleredwindow@hotmail.com!
Stephanie says
How many coats of acrylic paint did you have to use. I’ve done two coats, and the cardboard is still showing through. My son is sure excited! Thanks for the ideas!
Cassie May says
I want to say I did two coats. But I’ve found that it really depends on the brand of paint. If your box has a lot of markings on it, sometimes it helps to put a coat of dark gray or black under the blue just to even things out. 🙂
Debra Myers says
Whoops….I meant to say that I AM probably more overacheiver!
Debra Myers says
Hi Cassie,
Love, love, love, this, & my boys will too. I’ve always been a crafty kind of person, (although I think that your train goes above & beyond crafty !). Probably more overachiever!! I don’t think I will have any trouble with it. I was wondering if you had any more designs for cardboard box costumes. I have three grandsons. Thanks so much.
Debra Myers
Cassie May says
Hi Debra,
No. no more box costumes although I do have a cardboard box sewing machine and mailbox! Click on my crafts tab to see them!
Stephanie says
This looks so awesome! My son is also excited to be Thomas for Halloween. I think you said that you cut off the flaps from the bottom, I’m just wonder how you attached the platform/boot lid? Did you just glue around the bottom edge and stick it on?
Eric says
what did you use the shoebox for? is it for the roof? that is the only part i am having difficulty figuring out.
thank you so much for posting this.. if it works out my son will love it
Eric says
nvm figured out the boot box.. not shoe box ; > so my question still stands hehe.. how did you make the roof?
Christina says
What did you use for the eyes? Is it some sort of foam pieces? I figured out everything else but that part. Thank you!
Emily says
I am almost done wit but was wondering if you remembered what font you used for the number. I’m having a heck of a time finding one that is similar.
Thanks for everything! My nephew is going to love this!!!
miranda says
this was a great idea, thank you for sharing! im making this now for my son. what glue did you use for attaching the boxes used for the wheels and face? hotglue?
Cassie May says
yep! Hot glue!
Kylie says
Good Morning, I love this Thomas Train, I will be making it for my 3year old son for a school project. However I agree with Theresa the base box looks smaller than the body box, how did you get that to work?
Many thanks
Cassie May says
It was not smaller. It was bigger. 🙂
kris says
What a great costume. By chance do you have your measurements for cutting of the main box?
Cassie May says
I’m sorry, I don’t. It will really depend on what box you use. Just eyeball it, it will be fine!
Theresa says
I plan on making the Thomas for my 3yr old son. I understand all but the platform how did you do it the boot box looks smaller then the other
Cassie May says
The boot box was bigger than the other box.
Judy says
How did you attach the shoulder straps to the train? Thanks so much!
Cassie May says
I just used hot glue! 🙂
Sarah Jerome says
Love this costume! Where did you find the adorable cap and overalls??!! Such a cutie! Thanks for posting great ideas!
Sarah 🙂
Cassie May says
I bought them on amazon! Thanks for stopping by!
Melanie says
This by far the most creative costume tutorial I’ve ever read and I enjoyed your sense of humor. I too have that design challenge twitch… tell me it’s not possible and I’ll have to prove you wrong! Love it! I can’t wait to try this when my lo is older. There’s just something about those trains that have those boys hooked! 🙂
Cassandra May says
Thanks Melanie!
Judy says
What type of paint did you use? Did you prime the cardboard?
Cassandra May says
Hi Judy,
I just used regular acrylic craft paint, and no, I did not prime the cardboard. Although if your cardboard has a lot of markings that you want to cover up, it probably wouldn’t hurt. 🙂
Laura says
Thank you for posting such detailed instructions! My 3 year old daughter is a Thomas fanatic, and I do not like the costumes available for purchase. This will definitely be a challenge, but between myself and my engineer husband, I think we can pull it off! (I hope it doesn’t rain this Halloween, lol) I have this bookmarked and I am so grateful that we can use your model! I hope ours ends up half as nice as yours, though I am not holding my breath, lol. Your son is absolutely adorable!! GREAT job with this costume!!
Cassandra May says
It totally rained for us last year! Luckily some friends let us just play at their house. I’d love to see a pic if you make your own! Good luck!
Laura says
ACK on the rain! I’m working on this now. So far so good, but I am worried about the number and side details! And the paper mache! We will muddle through. I will definitely take a picture. And hopefully mine won’t be one of those Pinterest “nailed it!” pics, lol!
Krisy says
This is amazing! Can I buy it from you? My son wants to be Thomas and your costume looks professional! I’m not sure I have the time to do this and make it look as good.
Thanks!
Krisy
Cassandra May says
Oh how sweet! If my little one didn’t love it I’d consider it, but unfortunately he still plays with it all the time! Thanks for stopping by!
Krisy says
Bummmer!! I think I’m going to attempt to make this… What size box did you use for the body?
Cassandra May says
18″ x 12″ x 6″
Amanda says
What size was the box you used?
Cassandra May says
It was 18″ x 12″ x 6″! 🙂
Belinda Seger says
Hi, Thank you for your reply. I’ve nearly finished actually and cut the lines by hand with a ruler, they aren’t as neat as I wanted but still it’s all looking good. He’s wearing it tomorrow so I will definitely send a picture on…not sure who’s more excited me or him!
Belinda Seger says
Hi I love love love your costume!!!! I and am going to make one this week for my thomas obsessed son! just wanted to ask about the red lines you did on illustrator and if you had the document you could share please???? also i assume you printed on a3?x
Cassandra May says
Hi Belinda!
I’m sorry, I don’t have a document. When I was making it I just drew it in illustrator real quick and then didn’t save it because I didn’t think I’d be needing it again. Wish I had thought ahead to this question! You could easily cut the same shapes out of construction paper though if you want to go that route! I’d love to see yours when it’s done!
Katie @ The Casual Craftlete says
Wow…this is an amazing costume! You did just a wonderful job. My daughter loves Thomas. This will be one of my features from the blog hop so much sure to grab you ‘featured’ button on Sunday. Thanks SO much for sharing at the Frugal Crafty Home Blog Hop!
Katie
Samantha @ Five Heart Home says
This is adorable, and that conductor is pretty darn cute, too…great job!
Cassandra May says
Thank you Samantha!!
courtlady says
Your design is clever but what I really love is the smiling, happy boy! He is so happy and so proud! Keep these pictures, someday the grown man will say, “Hey Mom, do you remember the train costume you made me? I wish my kids could see it.”
Cassandra May says
Thanks so much! He does love it, I think he will definitely play with it for a looong time to come!
Emily says
You are so talented and creative. I love it!
Leslie says
Amazing!!!!!
thelovebump says
Totally amazing!!!!!!!!!! You have such talent to make this! And he is super cute too 🙂
J-L says
OMG! Only you! Question: Are the straps long enough to cross so they don’t slide off his shoulders?
Aunt Lunda says
You are amazing. O is a great model.
Eva says
Wow! I’m super impressed with your costume making skills! What a lucky guy you have!
Stopping by from Marvelous Mondays
http://www.wholefoodmomonabudget.com
Cassandra May says
Thanks Eva!!!