Learn all about knitting gauge and have all of your knitting gauge questions answered with this detailed FAQ!
I would wager to say that the number one most common question/confusion when people are learning to knit is knitting gauge. What is knitting gauge and how does it work? How does gauge affect my projects? How do I measure and calculate knitting gauge?
It takes most people a little time to wrap their heads around knitting gauge but it’s really important to pay attention to if you want your knitting projects to turn out well. You need to understand what gauge is and how it works.
And by the way, everything I’m going say about knitting gauge also applies to crochet gauge. So if you like both kinds of fiber crafts, you’re in the right place!
What is knitting gauge?
Basically knitting gauge is just a measurement of how big your stitches are. That’s really it. It sounds big and scary but that’s all it is. The size of your knitting stitches will affect the size of your final product. Think of it like this: if you build a house that’s 10 Lego bricks wide and then you build the exact same style of house but it’s 10 Duplo bricks wide, they have the same number of bricks but the final size of the houses is completely different. Does that make sense?
How is knitting gauge measured?
Knitting gauge is measured as a number of stitches or rows per inch or per centimeter. In the US, we use inches. And knitting gauge is most often measured as the number of stitches per 4 inches to get a more accurate count. If you use centimeters, then knitting gauge is most often measured as the number of stitches per 10 centimeters. Measuring over a larger distance rather than just one inch or one centimeter gives a more accurate measurement.
What about row gauge?
Row gauge is the number of rows (or rounds) of knitting per inch or centimeter. This is also measured over 4 inches or 10 centimeters. Row gauge is equally important but is often dealt with differently in knitting patterns. For example, many knitting patterns will tell you the number of stitches you need per inch and also how many stitches to cast on. But often, instead of telling you how many rows or rounds to knit, many knitting patterns will tell you to knit rows or rounds until your project measures a certain length. That’s because row gauge is much easier to adjust. You can just knit more or fewer rows until your project matches the size of the pattern. Boom. It’s a lot easier to deal with than stitch gauge.
Why does knitting gauge matter?
If your stitches aren’t the same size as the knitting pattern designer’s stitches, your finished item will also not be the same size as theirs. Think again about the difference between using Lego bricks and using Duplo bricks. The bricks are your stitches. If you build your knitting out of small stitches, your project will be small. If you build your knitting out of large stitches, your project will be large.
For example, imagine your pattern tells you the gauge should be 20 stitches per 4 inches. If you are making an ornament that is 40 stitches wide, the finished ornament should be 8 inches wide. If you start to make your ornament and your stitches measure a gauge of 18 stitches per 4 inches, your ornament will be 8.8 inches wide. That’s bigger because your stitches are bigger!
Does it really matter for an ornament? Maybe not but now let’s imagine a sweater. If you are making a sweater with the same required gauge: 20 stitches per 4 inches and the sweater is 200 stitches around, your sweater should measure 40 inches around when it’s finished. If you start knitting and are again getting a gauge of 18 stitches per 4 inches, your sweater will instead measure 44.4 inches around when you finish. That’s a really big difference! Your sweater will come out a whole size larger because your gauge did not match the pattern gauge.
What affects knitting gauge?
The size of your knitting stitches can be affected by the following variables:
- knitting needle size
- yarn weight/thickness
- number of stitches
- stitch pattern
- whether you’re knitting flat or in the round
- your tension
It’s really hard to change the number of stitches of a knitting pattern without doing a lot of math, the stitch pattern and method is set by the knitting pattern, and most people’s knitting yarn tension is constant, so of those 6 things, you can really only easily control 2 variables, knitting needle size and yarn thickness.
Let’s look at this in real life. First I have a swatch that I knit in worsted weight yarn with size US7 (4.5mm) knitting needles. I knit this swatch in regular stockinette stitch. The swatch is 24 stitches wide and 27 rows tall. The finished gauge is 20 stitches per 4 inches (you can zoom in and count if you want!)
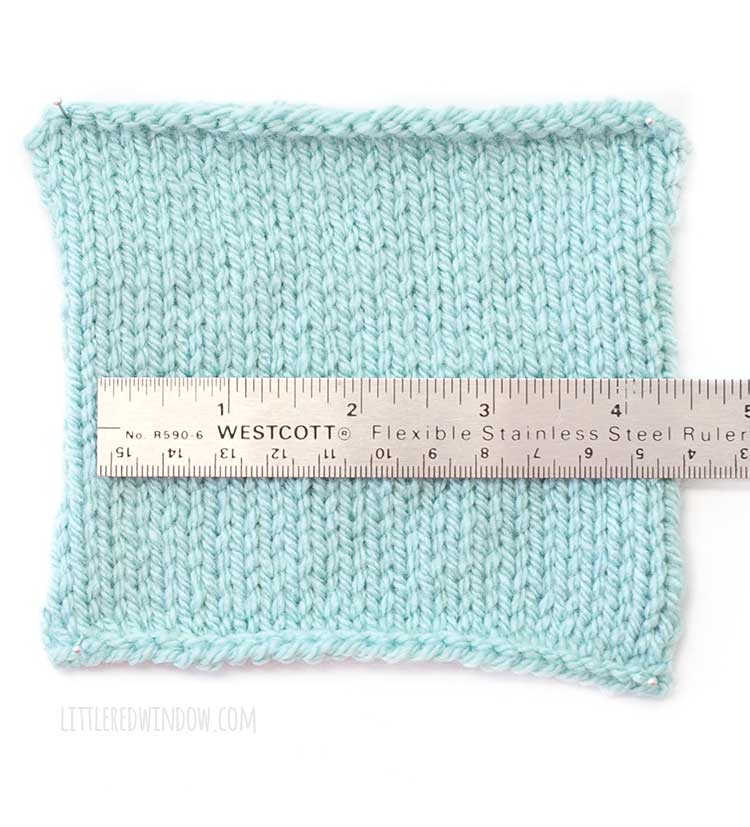
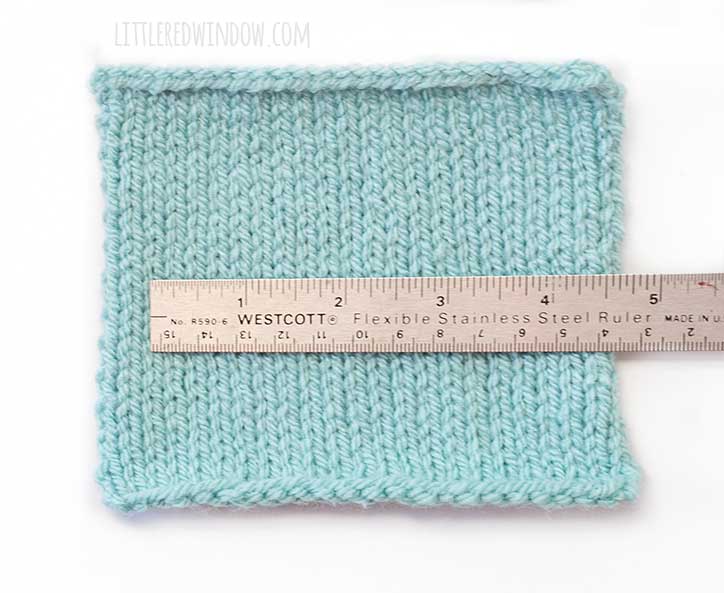
In the next photo the ONLY thing I changed was the size of my knitting needles. This swatch is the same worsted weight yarn. It is also 24 stitches wide and 27 rows tall. But this time, I used size US 8 (5.0 mm) knitting needles. Bigger knitting needles will make bigger stitches which will make bigger knitting. The swatch with larger needles now measures a gauge of 17 1/2 stitches per 4 inches. That’s a pretty big difference!
Here they are next to each other so you can see the difference. Remember the only thing I changed was the size of the knitting needles.
The other thing you can easily control and change is yarn weight/thickness. This is why I always recommend that you do NOT pick a different yarn weight than the pattern calls for. It will change the size of your knitting.
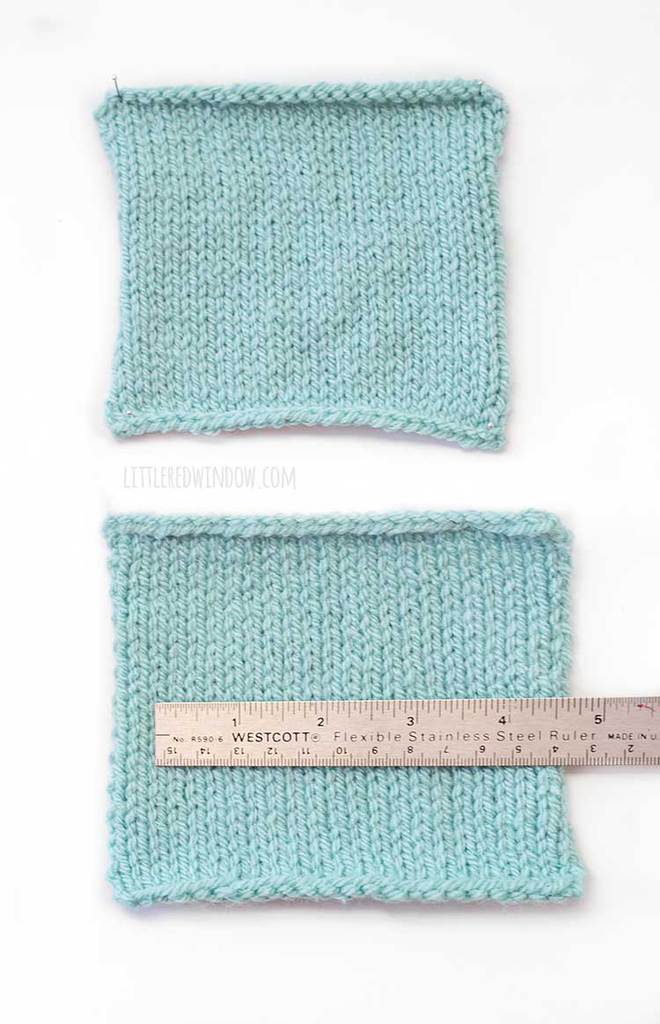
This image below shows two swatches where the only thing I changed was the yarn weight. They are both 24 inches wide and 27 rows tall and both knit with size US7 (4.5 mm) knitting needles. The top yarn is worsted weight yarn and the bottom yarn is DK/light worsted. The yarns don’t look super different, but you can see in the swatches that it makes a difference.
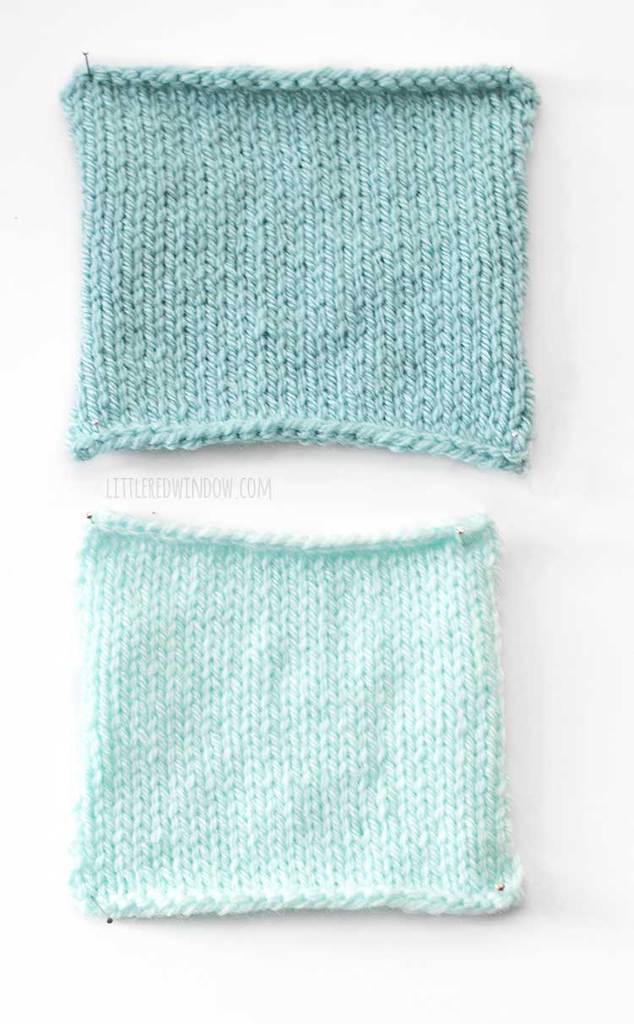
In these two swatches, everything again is identical except for the yarn weight. The top swatch, my normal worsted weight stockinette swatch, still has a gauge of 20 stitches and 24 rows per every 4 inches. The bottom swatch in DK weight has a gauge of 21 stitches and 27 rows per every 4 inches. Changing the yarn weight made my second swatch a lot smaller!
The bad news about yarn thickness is that there can be some small amount of variation in yarn weight and thickness between brands. There is also a difference in yarn weights between countries. For example, in the US we call size 4 medium yarn worsted weight while in the UK that’s aran and in Australia it’s 10 ply. (I have a whole post about that confusing topic if you want more info) That can easily result in some unintended differences in gauge. Just choose a yarn as similar as possible to the pattern yarn and I’ll tell you what to do if your gauge still isn’t matching below.
What about tension?
One thing that most people cannot control is their knitting tension. Knitting tension refers to how tightly or loosely you hold the working yarn as you knit. If you are a tight knitter, your yarn will be tighter around the needles and your stitches will be a little bit smaller. If you are a loose knitter your yarn will be looser around the needles and your stitches will be a little bit bigger. Most often beginners are tighter knitters. This is totally normal!
The good news is that since you are the one doing the knitting, your tension should remain relatively constant throughout a project and not change. But if you know you are a tight knitter or a loose knitter and you know it is affecting your gauge you may have to make some other adjustments to fix it as we’ll talk about below.
How do I know if my gauge is correct?
This is what swatching is for!
You really really should make a swatch for every project. Then measure the gauge of the swatch and see if your gauge matches the gauge specified in the knitting pattern. If it does not, you need to change something (see below) and if it does match, go ahead, you’re good to go!
How do you make a swatch?
You should make a swatch using EXACTLY the same conditions as your knitting pattern. These are the things that should be the same in your swatch as in the project:
- Use the same yarn
- Use the same knitting needles
- Use the same stitch pattern (for example stockinette vs. seed stitch)
- Knit your swatch in the round or flat, whichever way the project is knit
I cannot stress this enough, your swatch should be as close as possible to the project. If the project uses seed stitch knit flat, swatch with with seed stitch knit flat. If the pattern is garter stitch knit in the round, swatch with garter stitch knit in the round. That WILL make a difference. This also applies for lace and cable knitting. You need to swatch in the lace or cable patterns!
Using those criteria, make a swatch that is about 6 inches square. You want the swatch to be big enough to get an accurate measurement without having to measure any stitches on the edges of the swatch which can be distorted.
What about blocking?
I’m glad you asked! Blocking is another thing you should do to your swatch exactly like you will for your finished project. For example, if you are knitting a hat and probably won’t block it when it’s done, don’t block your swatch. If you are knitting a lace shawl and definitely will block it when it’s done, block your swatch. Want to see the difference blocking can make?
I knit two swatches that are exactly the same. Everything about them is identical. It’s even acrylic yarn which honestly doesn’t block all that well. I blocked the bottom swatch and did not block the top and you can see that they are different sizes! The top swatch is my normal 20 stitches per 4 inches and the bottom swatch is only 19 stitches per 4 inches!

How do I measure knitting gauge?
There are all kinds of fancy gauge rulers, but you really can use a regular ruler. Lay it on top of your swatch. Don’t start or end your measurement at either edge of your swatch, try to measure in the middle. Start counting the number of stitches at 0 and see how many fit between 0 and 4 inches (or 10 centimeters). You can count rows or rounds vertically the same way. That’s it!
My knitting gauge is incorrect, what should I do?
As I mentioned before, the two things you have control over in knitting gauge are the knitting needle size and the yarn thickness. I do not recommend, in most cases, changing the yarn thickness from what is recommended in the pattern. That’s not a good idea, it will change more than just the gauge as we saw above, it will also change the feel and drape of the knitting and you won’t like it.
So that leaves knitting needle size as a variable we can control to adjust knitting gauge. This is where most people get confused and believe me, it’s totally normal.
If your measured swatch knitting gauge has FEWER stitches per 4 inches or 10 cm than the gauge in the pattern, your stitches are too big. That means you need to try smaller needles to make your stitches smaller.
If your measured swatch knitting gauge has MORE stitches per 4 inches or 10 cm than the gauge in the pattern, your stitches are too small. That means you need to try larger needles to make your stitches larger.
If your gauge doesn’t match, change your needles and then make another swatch. Keep making swatches until your measured knitting gauge is correct.
So, how do you feel, does knitting gauge makes sense now or are you still confused? Hopefully it’s clear as can be and the takeaway is that knitting gauge is important and can make or break your pattern! So don’t skip measuring it!
Happy knitting!
If you liked this, you may also like some of my other posts…


- Tied Stocking Cap Knitting Pattern - May 19, 2026
- Pretty Purple Flower Hat Knitting Pattern - May 11, 2026
- Garter Scalloped Bonnet Knitting Pattern - May 5, 2026
Bec says
Thank you for your detailed post. I Understand swatches, but I hate them because I do them in the round and the long yarns on the back and the super loose end stitches drive me crazy. Sometimes I don’t do them because I want to get started on my project. I know…I’m bad. I’m going to try to do better. Just wanted to let you know that I’m impressed with how you explain things in your posts. I’m definitely bookmarking your site.