O has always been really interested in my sewing machine. The minute I turn the light on it’s mesmerizing to him. I
mean, when you think about it, it totally makes sense, a sewing machine is totally made of things little kids love–lots of buttons, moving parts, sharp things…
Of course we have lots of talks about how he can’t touch it because it’s sharp and dangerous, but a couple weeks ago when I had it out, for the first time he asked me when he could use it.
I don’t think he’s quite ready to do it even with complete supervision, but hopefully we can try soon. (Although I think I said he could do it when he turns 5 because I didn’t want him to think when I said, “maybe when you’re older” that I meant tomorrow and then have him ask me five million times…)
Anyway, of course the next thought was that he needed his own sewing machine! And if you’ve been reading for any length of time, you might know that the ultimate holy grail of crafting for me, is to make something awesome for as cheap as humanly possible.
In fact, this one ended up costing me a whopping $0! (Admission: I do have a kind of embarrassingly large craft stash though…but if you don’t, you could probably do the whole thing for under $10.)
I don’t know if you read my Crafter’s Guilt Post, but this is one of those projects I sometimes hesitate to share because I do fully realize that this is not something everyone would want to do. But hopefully you’ll be interested in how I did it and think it’s cute?
Maybe it will inspire other ideas? I am so into the idea of making things out of cardboard boxes these days (It helps that we live in a condo building where I can constantly access a gazillion in the recycling room).
I personally like the raw corrugated edges but if you don’t, you could use matte board or foam board or something with more finished edge.
I also want to add, because this is a question that I get a lot, this took me about half a day to make.
But I spent almost 4 years building architectural models so I’m probably speedier than most at building 3D volumes and working with cardboard. If you’ve never done something like this before, budget a more time.
DIY Cardboard Box Play Sewing Machine Supply List:
One cardboard box
ruler
little wooden dowels and beads that fit over the ends
Makedo connecting pieces or regular brads from the office supply store
DIY Cardboard Box Play Sewing Machine Instructions:
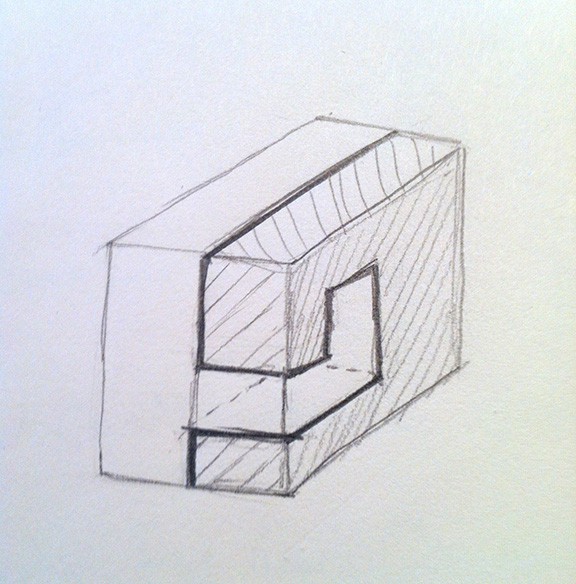
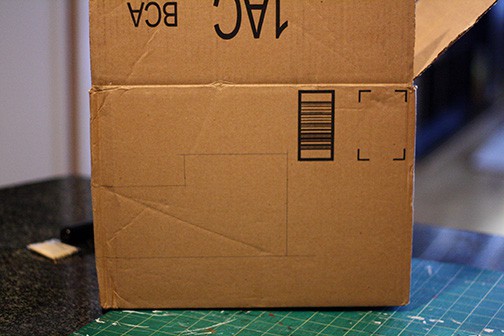
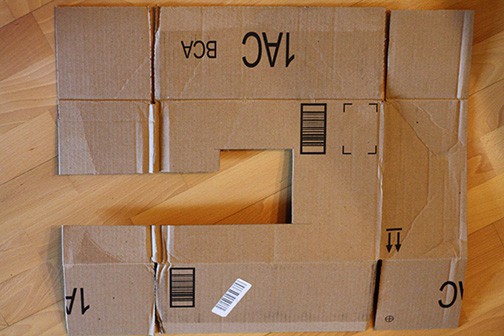
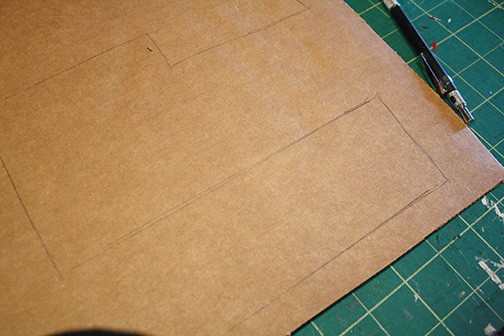
I’m going for kind of a play by play here, rather than super specific instructions with measurements because no two cardboard boxes are quite the same! Here’s my box:

First I drew a little sketch of how I was going to cut the box so I could visualize it before I started. I wanted to cut as few pieces as possible. The thick line is where I cut.
Then I transferred those marks to the box and cut them.
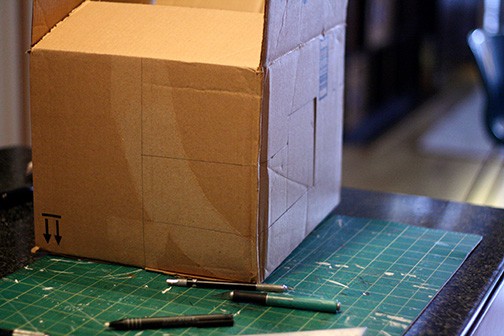
The last picture is of it opened up. I flipped it over after that so that all the markings would be on the inside. Then I folded up the side flaps first and secured them with hot glue on the inside. Don’t worry if your seams don’t look great, it will all be on the inside.
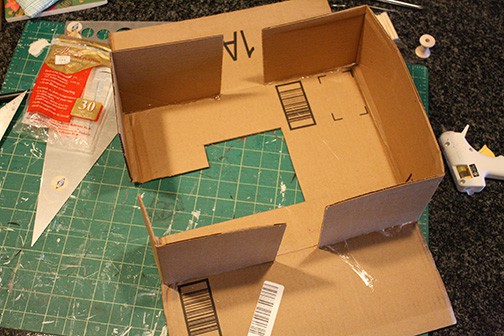
After that I folded up the tops and bottom flaps and glued those as well.

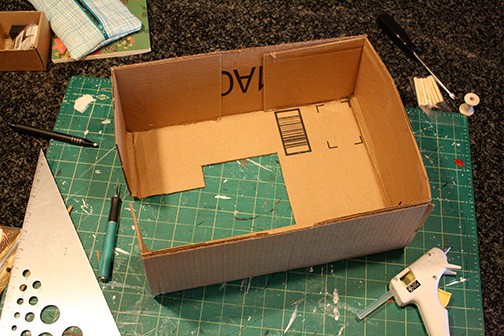
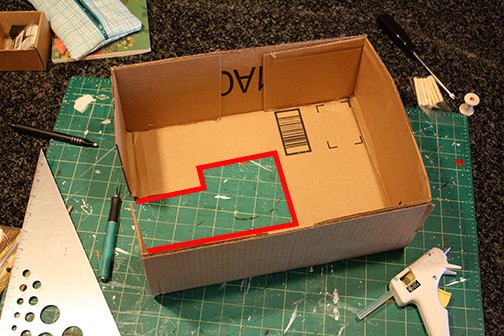
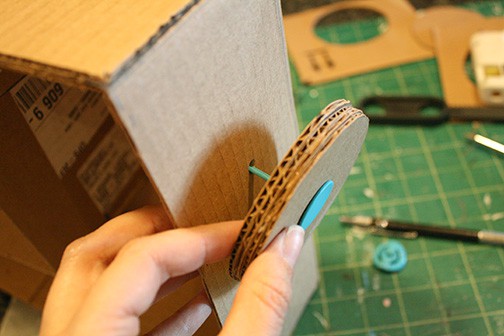
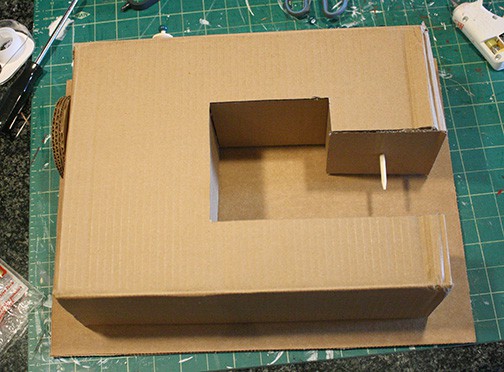
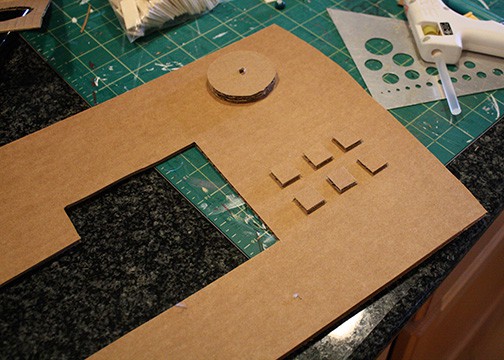
Next I needed to build the walls on the inside where I’ve drawn the red line below. My sewing machine was 4 inches thick so I cut strips of cardboard 4 inches wide and used them to build the insides here:
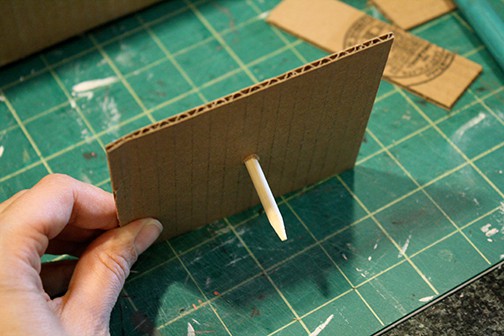
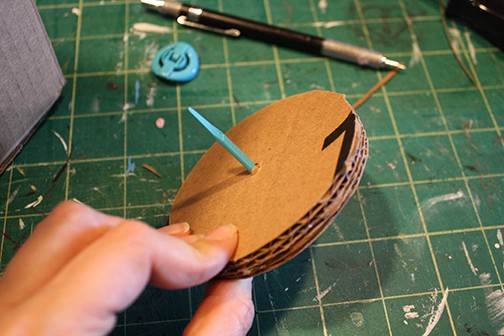
I started with the piece where the needle would be–I used a little 2 inch wooden dowel for the “needle”
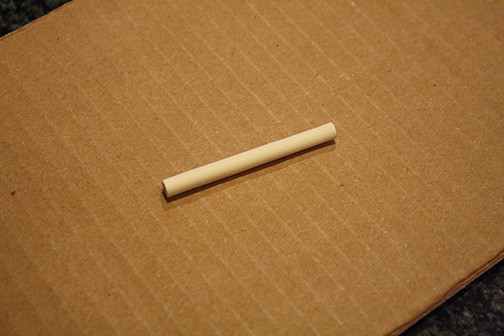
I partly sharpened it with a pencil sharpener so it would look more like a needle, but not all the way so it wouldn’t be pointy or dangerous. Then I poked a hole in the cardboard and inserted the dowel. I secured it on the inside with a big blob of hot glue.
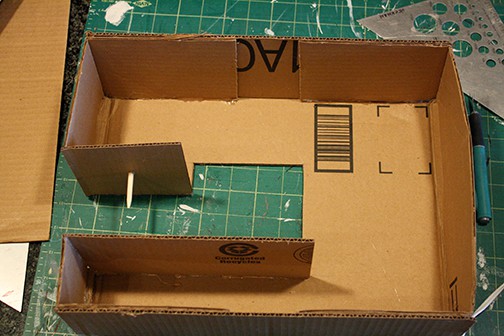
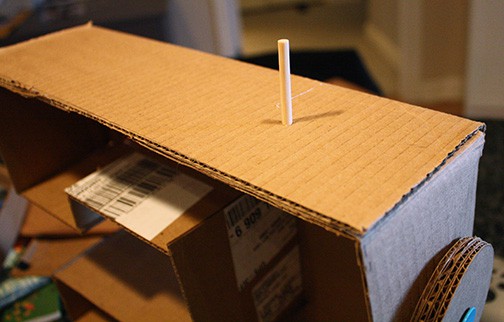
I added the rest of the inside pieces:
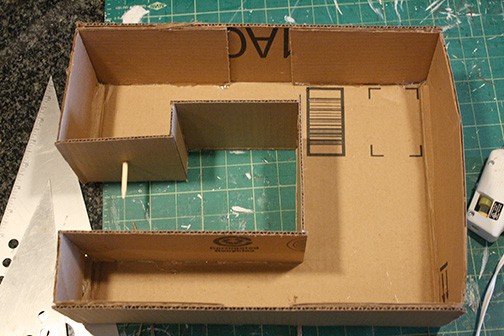
Before I closed it up, I added the flywheel and the spool pin. I cut several circles out of cardboard and glued them together to make the flywheel.
Like I said before, I like the raw corrugated edges of cardboard, but if you don’t, that’s cool, just cover them with paper or washi tape or something.
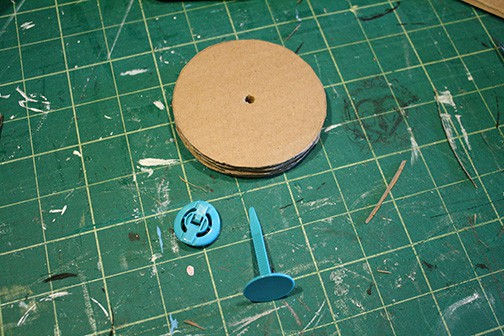
That little blue post and clip are Makedo connecting pieces . I bought these myself and no one at Makedo knows me at all but I think these are the coolest things EVER.
They make all kinds of connectors and hinges and things that you can use to transform cardboard and other found objects into really cool projects.
Ten year old me was soooooo excited to learn these existed! If you don’t have them, a regular old brad from the office supply store would work just fine.
***NOTE: 10/10/18 Since I made this project, they have discontinued that particular style of Makedo connectors. You want THESE instead, they work a little differently, but should work just fine. You could also try large brads, if you can’t find those.***
I poked a hole in the center of the flywheel with the included hole poking tool (technical term, I’m sure). Then I inserted the post piece from one side and then put it through a corresponding hole in the side of the sewing machine that I had poked with a screwdriver so it was a little bigger than the makedo post piece. This allowed the flywheel to spin.
The little blue clip snaps on from the back side (it’s adjustable) to secure it. Now the flywheel turns just like a real sewing machine!
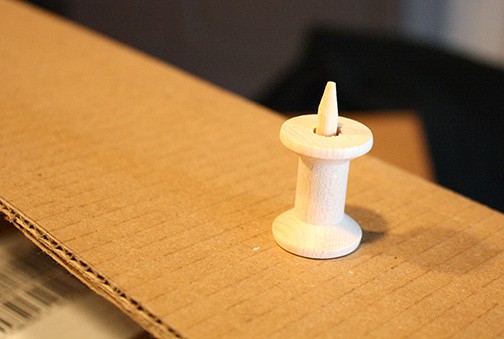
Then I used another little dowel to make a spool pin. Same method as the “needle’, poke a hole, put in the dowel, secure from the back with a blob of hot glue.
I also happened to have a little wooden spool that fit perfectly which is when I had the following funny conversation with Aa:
Me: Should I leave it so O can take the spool on and off the post?
Aa: If by take it on and off you mean lose it immediately, then no…
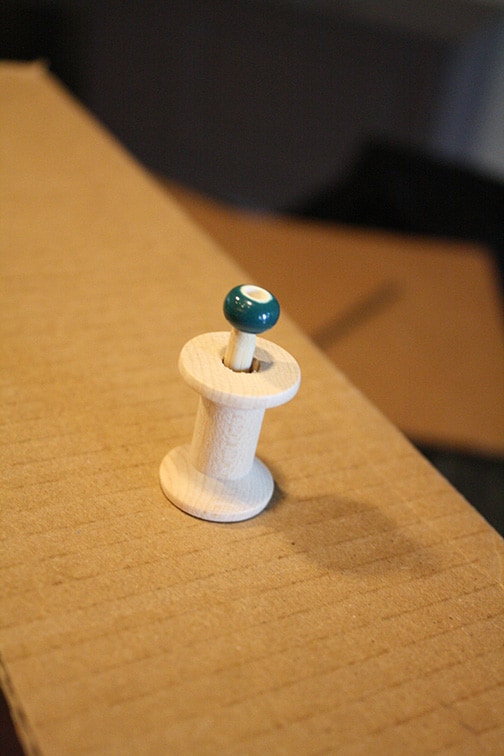
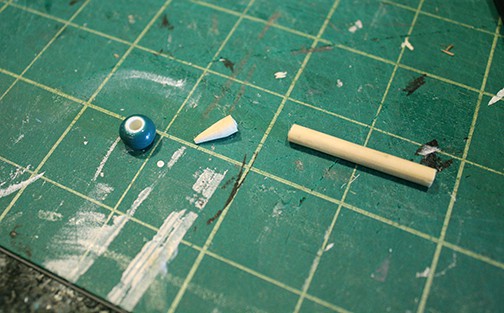
Ha! He had a good point, so I needed to secure it. I sharpened the end of my dowel a little bit with a pencil sharpener again and glued a little bead to the top to keep the spool on.
If you had a bigger bead that fit, you could skip the sharpening step. The spool still spins around so it’s plenty fun.
Now it just needed a front. I flipped the sewing machine over onto another piece of cardboard and just traced around it with a pencil and then cut it out:
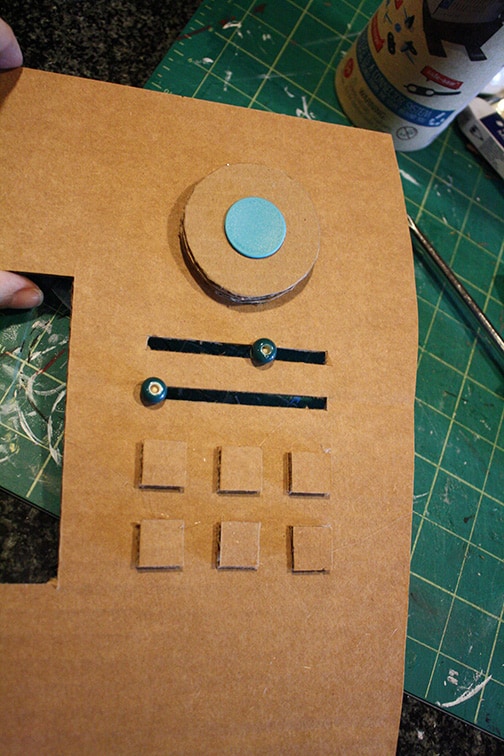
Before I attached the front to the machine, it was time to add some details. I made some square buttons and another dial for the front using the same method that I used for the flywheel.
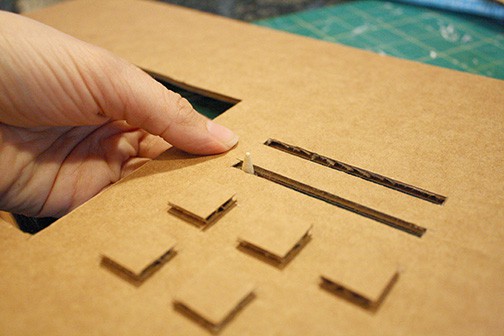
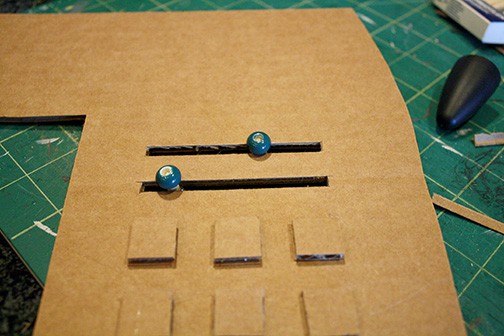
I also wanted to add some moving levers like a real sewing machine might have for stitch length or width. First I cut two slits across the front.
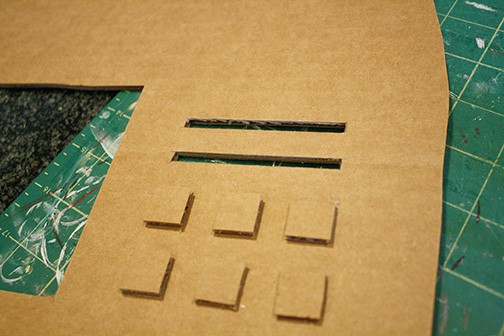
Then I used a little piece of dowel that would fit through the slot. I put a blob of hot glue on the back side so it wouldn’t fall out. Then I put it through the slot and attached a bead to the other end. Now the beads slide back and forth across the slots!

Then when all those pieces were added it was time to attach the front to the body of the machine carefully with glue.
When that was done I just added a few more details with a white paint pen and put some cute washi tape around the bottom and I was done!
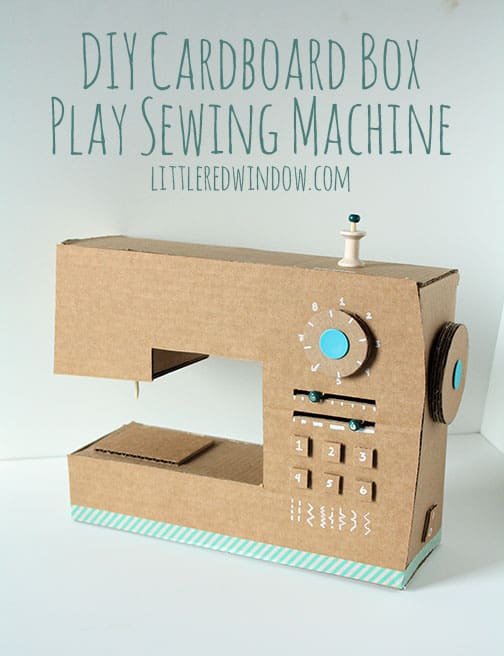
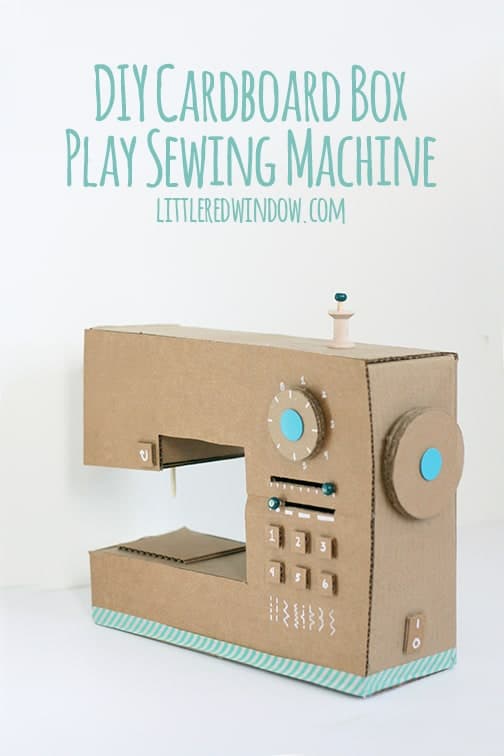
Make an adorable DIY Play Sewing Machine from an old cardboard box! Your little one will have a blast playing with it! Dimensions will depend on what size box you start with, I recommend measuring and sketching your own box to start! As an Amazon Associate and member of other affiliate programs, I earn from qualifying purchases.DIY Cardboard Box Play Sewing Machine
Materials
Instructions

Notes
Recommended Products

O really liked playing with it, although I had to laugh when I set it down and he immediately said, “Where’s my fabric??” A quick trip to my scrap bin and he was all set!

If you liked this, you may also like some of my other posts…

- Pretty Purple Flower Hat Knitting Pattern - May 11, 2026
- Garter Scalloped Bonnet Knitting Pattern - May 5, 2026
- 2 Colorblock Folded Brim Hat Knitting Pattern - April 29, 2026
Nanalye says
Wonderful ! I did it ! Thank you ! http://bricoltout.canalblog.com/archives/2017/09/11/35667342.html
Jacob says
Awesome tricks and finally the sewing machine is funky
Nancy Rector says
That is just UBER creative! I’ll share this on reddit and my other spots!
Cassie May says
thank you so much Nancy!
Jennie @ Little Girl Designs says
So clever and beautiful! I LOVE this!!! Thanks for the detailed tutorial. Going to share this with my facebook friends and pinning now! 🙂
Cassie May says
Thanks Jenny!!
tatiana papadakou says
Can you please tell me the carton box’s dimensions in cm??
Cassie May says
The finished sewing machine is 33 x 26 x 11 cm. I didn’t measure the entire box before I started but you can see from the photos how the finished size relates to the original box size. Hope that helps!
Svannah says
I LOVE IT!! This is so amazing. My daughter (nearly 2) loves watching me sew and she is always trying to touch or “help” in some way. This would be so great to give her. Will plan to make one this coming weekend!!
Thank you!!!
sally says
This is so cute does it work though if I make it can I actually sew a sock together or stitch a sweater
Cassie May says
No, it does not. 🙂
Janine says
I love it, I love it. Making things from cardboard boxes is my favourite hobby, apart from sewing, and corrugated card is wonderful to use. I usually don’t leave the edges raw – I paste them over with matching brown paper (even if I have to peel it from the box off cuts) and that makes lovely firm pieces. I am so pleased to see that I am not alone.
Janine in Australia
Tavette says
Wow. You give your little guy a great big hug from all of us for wanting you to make him his very own sewing machine. It’s fantastic and your step-by-step makes this look quite do-able.
When we were 5 or 6 my sister told my mom she wanted HER very own sewing machine and it had to be one “with an engine” so I fully understand the desire.
This would be a great centerpiece at a sewing association event and so, I’ve saved your instructions. Can’t wait to give it a whirl. You could decorate the front of the machine to match your own (real) machine. Set other hand made sewing “goodies” (i.e. thread catcher, pin cushion, etc.) around it and it would be the talk of the event.
To think you did all of this for $0. Well……might have to add in the cost of your architectural degree as an additional cost. But….the cost to us is $0 and I thank you and your little guy SO MUCH for this fantastic project. He is SOOOO cute sitting there at his machine. We’ll all be looking at cardboard in a totally different way from now on.
Tavette – S. Florida
Cassandra May says
Thank you so much! 🙂
Tata kids design says
I love it!!!!!!!
Steph @ Crafting in the Rain says
I’ve seen this featured a few places now and had to stop and leave my comment too–seriously so cute and creative!
Cassandra May says
Thanks so much Steph!!!
Momoko says
Hi I just shared this tutorial on my blog in my saturday favorites! here http://www.momokoplush.com/2014/05/preferiti-del-sabato-17.html
Sophie says
Thank you very mutch for this tuto !!
Like yours, my boy is too little ( 3 Years 1/2) for using my machine.
I’m going to Make one un cardbord for him.
Merci merci merci !!!!!! ( i’m french)
Shareba from In Search Of Yummy-ness says
This is so creative! And totally adorable too! I found this post over at the Sweet Sharing Monday link party 🙂
Natasha Mairs (Serenity You) says
This is unbelievably amazing!!! I’m in love with it! Featuring this on tomorrows Serenity Saturday party
Debbie says
How lucky your little boy is to have such a clever and creative Mum. I love the last picture of your little boy concentrating intensely on what he is sewing on the machine… So cute!
Pam says
This is such a cool craft! I wish my girls were not too old for it. Maybe I will have to make one for my nieces. 🙂 Thank you so much for linking up to Dare to Share, your post is today’s Dare to Share Feature of the Day
katelaineransom says
So clever and so creative! LOVE it!
Ren says
Once upon a time I made an entire desktop computer out of cardboard. I even gave the keys on the keyboard “action” by putting a piece of cotton under each one.
This is fabulous! What a lucky kid.
Thanks for linking up to Inspire Us Thursdays on The Inspired Wren.
Gloria Phillips says
You are so creative and talented, Cassie! This would be so fun for my niece to make. Absolutely love how you took the time to take pictures for the step by step tutorial! Thank you for sharing this DIY with us at the Show Stopper this week… love anything that has to do with sewing!
Molly says
This is truly fantastic! What a creative project, and right up my alley. I enjoy finding ideas that are unique and different (and with Pinterest it’s getting harder and harder to do) but this one just might be one of the best I’ve seen in a long time 🙂
Thanks for linking up last week to the Lovely Ladies link party, I’ve included your sewing machine in my features this week, you can check it out here if you’d like- http://www.justalittlecreativity.com/2014/05/lovely-ladies-linky-party-34-five-blogs.html
I’ve also pinned, it’s too cute to not be shared!
-Molly from Just a Little Creativity
Melissa says
LOOOVE this oh so much!! Shared & pinned & drooled!!! awesome job 🙂
Jennifer Dawn says
I know I already commented on how much I love this, but I wanted to also let you know that I’m featuring it at this week’s link party. http://www.thelifeofjenniferdawn.com/2014/05/a-little-bird-told-me-link-party-90.html
nikki@nikkisnacs says
Oh my goodness! My boys would think this is great!
Mel Lockcuff (@MamaBuzz) says
This is the cutest and most creative thing ever! I bet he loves it! It’s amazing the things you can make with a cardboard box. Love it. Thanks so much for sharing on Inspire Me Wednesday. Featuring you in this week’s issue.
Cassandra May says
Thanks Mel! That’s awesome!
Lauren @ The Thinking Closet says
This is SO much fun! Even though I pinned it to my “Kiddos: Someday Not Today” board, I don’t know if I can wait until then to create one. Off to share with my Facebook fans, too. Thanks for the inspiration!
Cassandra May says
awww, thanks Lauren! If you do, send me a pic!!
Kari - U Create says
So very CLEVER!!!
DearCreatives (@DearCreatives) says
Featuring this at the party this week Cassie. Thanks for sharing. Will be pinning & tweeting it!
Cassandra May says
awesome! thanks!
Alexis @ Persia Lou says
This is amazing! What a great detailed tutorial too! My kids are always fascinated by my sewing machine too, so I know it would be a big hit at my house. Love it! If you had a second to link up at The Makers link party over on my blog, that would be great! 🙂
Cassandra May says
I linked it up last week, Alexis! Thanks for stopping by!
Diane @ Vintage Zest says
I LOOOOOVE this! And I’m sure my niece and I would have fun putting this together for her! Also, congrats because you are featured on this week’s Do Tell Tuesday link party and have been pinned to our features board! Feel free to grab a button and link up this week too. 🙂 http://www.vintagezest.com/2014/05/do-tell-tuesday-22-with-features-co.html
Diane @ Vintage Zest
Stampendous says
This is beyond adorable! What a terrific project! Thanks so much for sharing it with us!
Ashley @ 3 Little Greenwoods says
I could not love this more! It’s amazing that you saw a play sewing machine for your little guy in a cardboard box!
Pinning to our Party Board!
Thanks so much for sharing your creativity with us at Show-Licious Craft & Recipe Party!
~ Ashley
Leslie Carmona says
This is adorable! Thank you for the tutorial!
saynotsweetanne says
Cassie, I absolutely LOVE this! The end result is so adorable not only for play, but as a photo prop or just a piece of art!
Cassandra May says
Thanks so much Kayla!! Thanks for featuring it this week!
Deborah Smith says
This is just darling! O must just love it. You are so creative! Thank you for sharing at What We Accomplished Wednesdays. Have a great week!
Blessings,
Deborah
Bethany Lee (@PitterAndGlink) says
This is so creative and cute! Great job!
Roberta says
Just fantastic! I featured you today on my blog in my Best of the Internet series! http://mommylikewhoa.com/2014/05/best-internet-volume-9/
mindfulshopper says
Hi Cassie:
This is absolutely adorable!!!! I love it!!! I shared it all over the place! 🙂 Also sharing some Pinterest and Bloglovin love! Can’t wait to come back!
Cassandra May says
That’s so sweet, Amy! Thank you!!!!
emmielou83 says
I ADORE this! Pinned and followed xox Visiting from emmieloves.blogspot.com xox
Cassandra May says
hey, thanks for stopping by! Nice to meet you!
Katherines Corner says
I think this is wonderful!!!!!! Thank you for sharing your wonderful blog at the Thursday Favorite Things Blog Hop. I will be featuring you on Monday ♥
Cassandra May says
Oh awesome! Thanks Katherine!
mindiehilton says
SEW impressive! You did a great job. Please come share at the Anything Goes linky if you have not already.
Marti @ SewliciousHomeDecor says
OMG…This is the cutest thing EVER!!!! Pinned! 🙂 Thanks for sharing it with us!
Christina @ I Gotta Create says
ADORABLE!!! Any child would love to play with this. Way to put those architectural model-building skills to creative use. Pinned it!!
Thanks for sharing at the linky party,
Christina @ I Gotta Create!
Cassandra May says
Gotta make that degree worth it Christina! 😉 Thanks for stopping by!
Mary Stewart says
Thank you so much for this tutorial. I see several American girl sewing machines in my future!
Cassandra May says
That is a great idea Mary! I love it! Send a pic if you do it!!!
Megan Walker says
OMG, I can’t believe you made this! So cute and adorable : )
Marvelous Mommy says
This turned out amazing! Pinning for later!
Ginny says
That is so cool. I love the final picture.
Helen Witthauer says
Adorable! Looks like fun. What a clever idea!.
Jenna Brussee (@aSavoryFeast) says
Awww! What a cute idea for kids who want to copy everything mom does. Thanks for linking up with Hump Day Happenings!
Beth @ Goodness Gracious Living says
So crazy crafty! Love it! Stopping by from SITS girls on FB!
Dayna Abraham says
Oh MY! Seriously you just got a new fan! This is adorable! Pinning and sharing later on my page!
Cassandra May says
Thanks Dayna! Nice to meet you!!
Alison says
Oh this is so cute, I love it! And to think it’s just made out of stuff that can be found around the house 🙂 Great job!
Stephanie says
That’s awesome! I love that it’s a recycled project, too. I hope my son wants to sew when he’s older!
Sew Can Do (@sewcandoblog) says
Absolutely adorable and fantastic that it cost $0! Your little guy looks so cute working there. Mine would love one of these. Pinning and planning to feature you at the next party. Thanks for linking to the Craftastic Monday party at Sew Can Do!
Cassandra May says
Thanks so much! Thanks for stopping by!!!
the cape on the corner says
wonderful! so creative.
Shecki @ Greatly Blessed says
That’s adorable! We love our Makedo connectors.
Cassandra May says
Aren’t they soooo awesome Shecki?!
Cheri says
How cute! What a great way to get a child into sewing! I just taught my 7 yo grand daughter to sew on my machine..she made a lap quilt and wants to do another one!
Cassandra May says
I can’t wait for that, Cheri!
Grace says
This is SO cool!!!!!
Jennifer Dawn says
No way! This is too cute! LOVE it!
Bonnie says
That is SO CUTE! What a great idea.
Susan @ Oh My! Creative says
This is so cool!
B.Brittain-Marshall (@ritewhileucan) says
How could we not think this is cute?! It is adorable. Looks like a lot of work but results are completely worth it. Hope he had fun sewing with mama. I just pinned this treasure.
Emma says
Eeeek! So cute. 🙂 Thanks for sharing……pinned it!
Kristy O says
This is SOOO cute. It’s so creative. I’m pinning this to share wiht my friends with kids. They would absolutely adore this!
Tanya @ Mom's Small Victories says
so cute. I stumbled and pinned this!
Cassandra May says
Thanks Tanya!!!
DearCreatives (@DearCreatives) says
Your project is great. Imaginative play is so important. I love that he asked for fabric. Just wait you might have a future sewer on your hands. Sewing is a great skill for everyone! Theresa @DearCreatives
Amy W says
OH MY WORD. This is unbelievable. I am crazy for this project… you should sell these!! Please come share on our link party going on now. I’m also going to be pinning this like crazy. I love it.
http://www.delineateyourdwelling.com/2014/04/link-it-or-lump-it-party-number-35.html
Cassandra May says
oh my gosh, thanks Amy!
Amy W says
Congrats! I am featuring your amazing sewing machine on our Link party today. Be sure to stop over and grab a feature button. http://www.delineateyourdwelling.com/2014/05/link-it-or-lump-it-party-36.html
Emily says
I can just imagine you two sewing together. So sweet!